Elastic Email Typescript Axios API Library
Introduction
When you integrate Elastic Email with your application, you can interact with your Elastic Email account directly by our API. You can easily integrate your email flow, manage your contacts and templates, send emails, and track email statistics directly from your app.
This page will help you easily integrate with Elastic Email using the Typescript Axios library. You can find our whole downloadable Typescript Axios repository on GitHub. You can also use our comprehensive API documentation.
Elastic Email API v4 uses REST architecture, which allows you to perform various code actions, including directly through your app.
The maximum email size of your entire message or message + attachment cannot exceed 20MB.
The attachment format is the file’s content as a byte array or a Base64 string.
The maximum number of recipients has no limit for one campaign. It depends on the pricing plan.
The API has a limit of 20 concurrent connections and a hard timeout of 600 seconds per request.
On this page, you will find how to authenticate your application and what the requirements for the integration are. You will be also provided with a quick start guide on how to start using API, followed by code samples.
Authentication
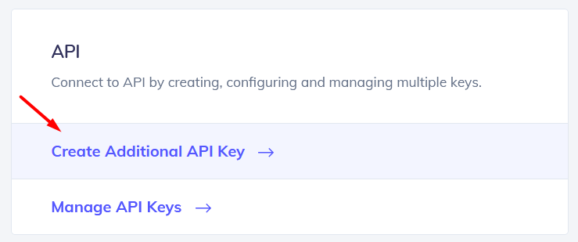
To provide valid authentication and start using our API, you will need an API key. To generate your API key, enter settings on your Elastic Email account and go to Settings -> Manage API Keys -> Create or you can also click on the link:
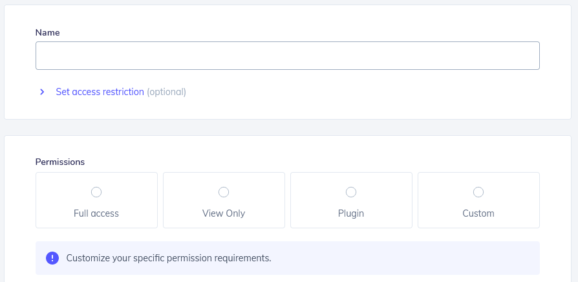
At this point, you can set custom permissions and optional access for your API key.
Security tip: The restriction forces the API Key to work only with an IP or IP range that will be specified in this field.
Once you create your API key, keep it safe as it will be used for every API call you make in order to identify you and confirm your account’s credentials. You can create either up to 15 or an unlimited amount of API keys based on your pricing plan.
Your API key should be sent inside the header with the parameter name ‘x-elasticemail-apikey’ and your API key as a value.
Installation and Usage
Requirements
This generator creates TypeScript/JavaScript client that utilizes axios. The generated Node module can be used in the following environments:
Environment
- Node.js
- Webpack
- Browserify
Language level
- ES5 - you must have a Promises/A+ library installed
- ES6
Module system
- CommonJS
- ES6 module system
It can be used in both TypeScript and JavaScript. In TypeScript, the definition should be automatically resolved via package.json. (Reference)
Installation
Run in your project npm install @elasticemail/elasticemail-client-ts-axios or download from our GitHub repository.
Quick start guide
In this section, we will tell you the steps to start sending emails with our email API.
1. Register a free account
Register and activate your Elastic Email account to get access to our product.
2. Verify your domain
Follow the instructions on our settings page to verify your domain and start sending with us.
3. Create an API Key
Go to your setting to generate an API Key to add to your code later.
4. Install our libraries
Install our Typescript Axios library as explained in the Installation and usage section.
5. Send your first email with API
Now it’s time to send your first test email with API to make sure that everything is set up correctly after downloading the library and the authentication process.
import { Configuration, EmailsApi, EmailMessageData } from '@elasticemail/elasticemail-client-ts-axios';

/* Generate and use your API key */

const config = new Configuration({
    apiKey: "YOUR_API_KEY"
});

const emailsApi = new EmailsApi(config);

const emailMessageData = {
    Recipients: [
      {
        Email: "MeowWow ",
        Fields: {
          name: "Name"
        }
      }
    ],
    Content: {
      Body: [
        {
          ContentType: "HTML",
          Charset: "utf-8",
          Content: "My test email content ;)"
        },
        {
          ContentType: "PlainText",
          Charset: "utf-8",
          Content: "Hi {name}!"
        }
      ],
      From: "MyEmail ",
      Subject: "Typescript Axios EE lib test"
    }
  }; // interface EmailMessageData from '@elasticemail/elasticemail-client-ts-axios'

const sendBulkEmails = (emailMessageData: EmailMessageData): void => {
  emailsApi.emailsPost(emailMessageData).then((response) => {
      console.log('API called successfully.');
      console.log(response.data);
  }).catch((error) => {
      console.error(error);
  });
};

sendBulkEmails(emailMessageData)
Code Samples
Once you have sent the test email with our API, you can start sending transactional emails and perform various operations directly through your app. We have prepared for you some code samples for most essential actions, including managing contacts and lists, creating templates, and sending and tracking emails. Thanks to them, your integration with our API will be an even easier and more pleasant experience.
In case any of the following snippets are changed in the meantime, the most recent version of this API Library is available on GitHub.
Managing Contacts
In this section, we will walk you through managing the contacts on your account using the Typescript Axios library.
Add Contacts
To add contacts to your account, you will need Access Level: ModifyContacts.
Put the following code into your file.
Load library using the following line:
import { Configuration, ContactsApi, ContactPayload } from '@elasticemail/elasticemail-client-ts-axios';
Create config including your apikey:
const config = new Configuration({
    apiKey: "YOUR_API_KEY"
});
Create an instance of ContactsApi that will be used to add contacts.
Create an array with a maximum of 1000 contacts. Field 'Email' is required.Find out more by checking our API's documentation.
You can pass an existing list names, otherwise, contacts will be added to all contacts (if you pass an empty array).
Create a function calling contactsPost method from the API to add contacts. You may include console logs called when the response comes back. In case of error it will display error details, otherwise it will display a success message and chosen details about the newly created campaign.
And finally, call addContacts function with proper arguments:
Delete contacts
If you want to delete a contact, you will need Access Level: ModifyContacts.
To delete a contact, put the following code into your file.
Load library using the following line:
import { Configuration, ContactsApi } from '@elasticemail/elasticemail-client-ts-axios';
Create config including your apikey:
const config = new Configuration({
    apiKey: "YOUR_API_KEY"
});
Create an instance of ContactsApi that will be used to delete contact.
const contactsApi = new ContactsApi(config);
Specify a contact to delete.
Find out more by checking our API's documentation.
const contact = 'example@address.com'; // string
Create a function calling contactsByEmailDelete method from the API to remove a contact. You may include console logs called when the response comes back. In case of error it will display error details, otherwise it will display a success message and chosen details about the newly created campaign.
const deleteContact = (contact: string): void => {
    contactsApi.contactsByEmailDelete(contact).then((response) => {
        console.log('API called successfully.');
        console.log(response.data);
    }).catch((error) => {
        console.error(error);
    });
}
And finally, call deleteContact function with proper arguments:
deleteContact(contact);
Upload Contacts
If you want to upload contacts from a CSV file using the Typescript Axios library, you will need Access Level: ModifyContacts.
To upload contacts, put the following code into your file.
Load library using the following line:
import { Configuration, ContactsApi } from '@elasticemail/elasticemail-client-ts-axios';
Create config including your apikey:
const config = new Configuration({
    apiKey: "YOUR_API_KEY"
});
Create an instance of ContactsApi that will be used to upload contacts from a CSV file.
const contactsApi = new ContactsApi(config);
In this example, we will load a CSV file that contains a list of contacts.
The simplest CSV file requires only one column Email, eg.:
Email
john@johnsmith.com
Find out more by checking our API's documentation.Use input type="file" to enable file upload and create a button which will trigger your API call uploadContacts described below.
<input type="file"></input>
<button onclick={uploadContacts()}>Upload contacts</button>
Create an event listener and function to save uploaded files as a variable.
input.addEventListener('change', saveFile);
let file;

const saveFile = (event) => {
    file = event.target.files[0];
  }
Create variables with fileName and encodingName.
const listName = 'My list'; // string
const encodingName = 'utf-8'; // string
Create a function calling contactsImportPost method from the API to upload contacts. You may include console logs called when the response comes back. In case of error it will display error details, otherwise it will display a success message and chosen details about the newly created campaign.
const uploadContacts = (listName: string, encodingName: string, file: any): void => {
    contactsApi.contactsImportPost(listName, encodingName, file).then((response) => {
        console.log('API called successfully.');
        console.log(response.data);
    }).catch((error) => {
        console.error(error);
    });
}
And finally, call uploadContacts function with proper arguments:
uploadContacts(listName, encodingName, file);
Export Contacts
If you want to export the selected contact to a downloadable file, you will need Access Level: Export.
Put the following code into your file.
Load library using the following line:
import { Configuration, ContactsApi, ExportFileFormats, CompressionFormat } from '@elasticemail/elasticemail-client-ts-axios';
Create config including your apikey:
const config = new Configuration({
    apiKey: "YOUR_API_KEY"
});
Create an instance of ContactsApi that will be used to export selected contacts.
const contactsApi = new ContactsApi(config);
To export contacts, you can specify a rule (eg. contacts list/segment or statuses) or list of emails. You can't provide both, only one or the other.
Find out more by checking our API's documentation.
const rule = 'exampleFilterRule'; // string or undefined if you want to provide list of emails
const emails = []; // string[] or empty array if you want to provide a rule
You also need to add some more options: file and compression format and file name.
const fileFormat = 'Csv'; // interface ExportFileFormats: 'Csv' || 'Xml' || 'Json'
const compressionFormat = 'None'; // interface CompressionFormat: 'None || 'Zip
const fileName = 'fileName.csv'; // name of your file including extension in string
Create a function calling contactsExportPost method from the API to export contacts. You may include console logs called when the response comes back. In case of error it will display error details, otherwise it will display a success message and chosen details about the newly created campaign.
const exportContacts = (fileFormat: ExportFileFormats, rule: string, emails: string[], compressionFormat: CompressionFormat, fileName: string): void => {
    contactsApi.contactsExportPost(fileFormat, rule, emails, compressionFormat, fileName).then((response) => {
        console.log('API called successfully.');
        console.log(response.data);
    }).catch((error) => {
        console.error(error);
    });
};
And finally, call exportContacts function with proper arguments:
exportContacts(fileFormat, rule, emails, compressionFormat, fileName)
Managing Lists
In this section, we will walk you through managing your contact list on your account using the Typescript Axios library.
Add List
To add a list, you will need Access Level: ModifyContacts.
Put the following code into your file.
Load library using the following line:
Load List
To load a list, you will need Access Level: ViewContacts.
Put the following code into your file.
Load library using the following line:
import { Coonfiguration, ListsApi, ListPayload } from '@elasticemail/elasticemail-client-ts-axios';
Create config including your apikey:
const config = new Configuration({
    apiKey: "YOUR_API_KEY"
});
Create an instance of ListsApi that will be used to add the list.
const listsApi = new ListsApi(config);
Create an object with new list details. ListName field is required.
Find out more by checking our API's documentation.
const listPayload = {
    ListName: "New list",
    AllowUnsubscribe: true,
    Emails: ["example@address.com"] // existing emails or empty to add all contacts
}; // interface ListPayload from '@elasticemail/elasticemail-client-ts-axios'
Create a function calling listsPost method from the API to add a new list. You may include console logs called when the response comes back. In case of error it will display error details, otherwise it will display a success message and chosen details about the newly created campaign.
const addList = (listPayload: ListPayload): void => {
    listsApi.listsPost(listPayload).then((response) => {
        console.log('API called successfully.');
        console.log(response.data);
    }).catch((error) => {
        console.error(error);
    });
}
And finally, call addList function with proper arguments:
addList(listPayload);
Load List
To load a list, you will need Access Level: ViewContacts.
Put the following code into your file.
Load library using the following line:
import { Coonfiguration, ListsApi } from '@elasticemail/elasticemail-client-ts-axios';
Create config including your apikey:
const config = new Configuration({
    apiKey: "YOUR_API_KEY"
});
Create an instance of ListsApi that will be used to load contacts list details.
const listsApi = new ListsApi(config);
Specify list name.
Find out more by checking our API's documentation.
const listName = 'Example list' // string
Create a function calling listsByNameGet method from the API to load list details. You may include console logs called when the response comes back. In case of error it will display error details, otherwise it will display a success message and chosen details about the newly created campaign.
const loadList = (listName: string): void => {
    listsApi.listsByNameGet(listName).then((response) => {
        console.log('API called successfully.');
        console.log(response.data);
    }).catch((error) => {
        console.error(error);
    });
};
And finally, call loadList function with proper arguments:
loadList(listName);
Delete List
To remove a contact list from your account, you will need Access Level: ModifyContacts.
Put the following code into your file.
Load library using the following line:
import { Coonfiguration, ListsApi } from '@elasticemail/elasticemail-client-ts-axios';
Create config including your apikey:
const config = new Configuration({
    apiKey: "YOUR_API_KEY"
});
Create an instance of ListsApi that will be used to delete the list.
const listsApi = new ListsApi(config);
Specify list name.
Find out more by checking our API's documentation.
const listName = 'Example list' // string
Create a function calling listsByNameDelete method from the API to delete list. You may include console logs called when the response comes back. In case of error it will display error details, otherwise it will display a success message and chosen details about the newly created campaign.
const deleteList = (listName: string): void => {
    listsApi.listsByNameDelete(listName).then((response) => {
        console.log('API called successfully.');
        console.log(response.data);
    }).catch((error) => {
        console.error(error);
    });
};
And finally, call deleteList function with proper arguments:
deleteList(listName);
Creating Templates
An email template is a body of email prepared and saved under a given name. In this section, you will get to know how to add and load email templates.
Add Template
To add a template, you will need Access Level: ModifyTemplates.
Put the following code into your file.
Load library using the following line:
import { Configuration, TemplatesApi, TemplatePayload } from '@elasticemail/elasticemail-client-ts-axios';
Create config including your apikey:
const config = new Configuration({
    apiKey: "YOUR_API_KEY"
});
Create an instance of TemplatesApi that will be used to add a new template.
const templatesApi = new TemplatesApi(config);
Create an object with details about the new template:
- Name – the name of your template by which it can be identified
- Subject – specify default subject
- Body – the content of the template
- TemplateScope – specify scope, the "Personal" template won't be shared, "Global" template can be shared with subaccounts.
Find out more by checking our API's documentation.
const templatePayload = {
    Name: 'New template',
    Subject: 'Default subject',
    Body: [{
      ContentType: 'HTML',
      Charset: 'utf-8',
      Content: '<div>My template</div>'
    }],
    TemplateScope: 'Personal',
}; // interface TemplatePayload from '@elasticemail/elasticemail-client-ts-axios'
Create a function calling templatesPost method from the API to add a new template. You may include console logs called when the response comes back. In case of error it will display error details, otherwise it will display a success message and chosen details about the newly created campaign.
const addTemplate = (templatePayload: TemplatePayload): void => {
    templatesApi.templatesPost(templatePayload).then((response) => {
        console.log('API called successfully.');
        console.log(response.data);
    }).catch((error) => {
        console.error(error);
    });
};
And finally, call addTemplate function with proper arguments:
addTemplate(templatePayload);
Load Template
To load existing template details, you will need Access Level: ViewTemplates.
Put the following code into your file.
Load library using the following line:
import { Configuration, TemplatesApi } from '@elasticemail/elasticemail-client-ts-axios';import { Configuration, TemplatesApi } from '@elasticemail/elasticemail-client-ts-axios';
Create config including your apikey:
const config = new Configuration({
    apiKey: "YOUR_API_KEY"
});
Create an instance of TemplatesApi that will be used to load template details.
const templatesApi = new TemplatesApi(config);
Specify existing template name.
Find out more by checking our API's documentation.
const templateName = 'My template' // string
Create a function calling templatesByNameGet method from the API to load template details. You may include console logs called when the response comes back. In case of error it will display error details, otherwise it will display a success message and chosen details about the newly created campaign.
const loadTemplate = (templateName: string): void => {
    templatesApi.templatesByNameGet(templateName).then((response) => {
        console.log('API called successfully.');
        console.log(response.data);
    }).catch((error) => {
        console.error(error);
    });
};
And finally, call loadTemplate function with proper arguments:
loadTemplate(templateName);
Delete Template
To delete a template, you will need Access Level: ModifyTemplates.
Put the following code into your file.
Load library using the following line:
import { Configuration, TemplatesApi } from '@elasticemail/elasticemail-client-ts-axios';
Create config including your apikey:
const config = new Configuration({
    apiKey: "YOUR_API_KEY"
});
Create an instance of TemplatesApi that will be used to delete the template.
const templatesApi = new TemplatesApi(config);
Specify the name of the template you want to delete.
Find out more by checking our API's documentation.
const templateName = 'My template' // string
Create a function calling templatesByNameDelete method from the API to delete existing templates. You may include console logs called when the response comes back. In case of error it will display error details, otherwise it will display a success message and chosen details about the newly created campaign.
const deleteTemplate = (templateName: string): void => {
    templatesApi.templatesByNameDelete(templateName).then((response) => {
        console.log('API called successfully.');
        console.log(response.data);
    }).catch((error) => {
        console.error(error);
    });
};
And finally, call deleteTemplate function with proper arguments:
deleteTemplate(templateName);
Sending Emails
In this section, we will tell you how you can start sending emails using the Typescript Axios library. You will get to know how to send bulk and transactional emails.
Send Transactional Emails
To send transactional emails, you will need Access Level: SendHttp.
Put the following code into your file.
Load library using the following line:
import { Configuration, EmailsApi, EmailTransactionalMessageData } from '@elasticemail/elasticemail-client-ts-axios';
Create config including your apikey:
const config = new Configuration({
    apiKey: "YOUR_API_KEY"
});
Create an instance of EmailsApi that will be used to send transactional emails.
const emailsApi = new EmailsApi(config);
Specify email details:
- recipients
- content:
- body parts
- from email – it needs to be your validated email address
- email subject
Find out more by checking our API's documentation.
const emailTransactionalMessageData = {
    Recipients: {
      To: ["example@address.com"] // maximum 50 recipients
    },
    Content: {
      Body: [
        {
          ContentType: "HTML",
          Charset: "utf-8",
          Content: "<strong>Example content<strong>"
        },
        {
          ContentType: "PlainText",
          Charset: "utf-8",
          Content: "Example content"
        }
      ],
      From: "myemail@address.com",
      Subject: "Example transactional email"
    }
}; // interface EmailTransactionalMessageData from '@elasticemail/elasticemail-client-ts-axios'
Create a function calling emailsTransactionalPost method from the API to send transactional emails. You may include console logs called when the response comes back. In case of error it will display error details, otherwise it will display a success message and chosen details about the newly created campaign.
const sendTransactionalEmails = (emailTransactionalMessageData: EmailTransactionalMessageData): void => {
  emailsApi.emailsTransactionalPost(emailTransactionalMessageData).then((response) => {
      console.log('API called successfully.');
      console.log(response.data);
  }).catch((error) => {
      console.error(error);
  });
};
And finally, call sendTransactionalEmails function with proper arguments:
sendTransactionalEmails(emailTransactionalMessageData);
Send Bulk Emails
Put the following code to your file to send a bulk email, meaning a single email sent to a large group at once.
You will need Access Level: SendHttp.
Load library using the following line:
import { Configuration, EmailsApi, EmailMessageData } from '@elasticemail/elasticemail-client-ts-axios';
Create config including your apikey:
const config = new Configuration({
    apiKey: "YOUR_API_KEY"
});
Create an instance of EmailsApi that will be used to send bulk emails.
const emailsApi = new EmailsApi(config);
Specify email details:
- email recipients:
- this example demonstrates merge fields usage, for each recipient
{name}will be changed to the recipient's name
- this example demonstrates merge fields usage, for each recipient
- email content:
- body parts
- from email – it needs to be your validated email address
- email subject
Find out more by checking our API's documentation.
const emailMessageData = {
    Recipients: [
      {
        Email: "example@address.com",
        Fields: {
          name: "Name"
        }
      }
    ],
    Content: {
      Body: [
        {
          ContentType: "HTML",
          Charset: "utf-8",
          Content: "<strong>Hi {name}!<strong>"
        },
        {
          ContentType: "PlainText",
          Charset: "utf-8",
          Content: "Hi {name}!"
        }
      ],
      From: "myemail@address.com",
      Subject: "Example bulk email"
    }
}; // interface EmailMessageData from '@elasticemail/elasticemail-client-ts-axios'
Create a function calling emailsPost method from the API to send bulk emails. You may include console logs called when the response comes back. In case of error it will display error details, otherwise it will display a success message and chosen details about the newly created campaign.
const sendBulkEmails = (emailMessageData: EmailMessageData): void => {
  emailsApi.emailsPost(emailMessageData).then((response) => {
      console.log('API called successfully.');
      console.log(response.data);
  }).catch((error) => {
      console.error(error);
  });
};
And finally, call sendBulkEmails function with proper arguments:
sendBulkEmails(emailMessageData);
Managing Campaigns
Add Campaign
To add your first campaign using the Typescript Axios library, you will need Access Level: ModifyCampaigns. Mind that when using Elastic Email, when you send an email to any group of contacts, we call it a “campaign”.
To add a campaign, put the following code into your file.
Load library using the following line:
import { Configuration, CampaignsApi, Campaign } from '@elasticemail/elasticemail-client-ts-axios';
Create config including your apikey:
const config = new Configuration({
    apiKey: "YOUR_API_KEY"
});
Create an instance of CampaignsApi that will be used to create a campaign.
const campaignsApi = new CampaignsApi(config);
Create an example campaign object:
- Name: defines campaign name by which you can identify it later
- Recipients: define your audience
- Content: define your message details
- Status: define the status in which the campaign should be created
Find out more by checking our API's documentation.
Send will be triggered immediately or postponed, depending on the given options. Because we define Status as Draft, in this case, it will be postponed and the campaign will be added to drafts.
const newCampaign = {
    Name: 'New campaign',
    Recipients: {
      ListNames: ['my list name'],
      SegmentNames: null,
    },
    Content: [{
      From: 'myemail@address.com',
      ReplyTo: 'myemail@address.com',
      TemplateName: 'your_template',
      Subject: 'Hello'
    }],
    Status: 'Draft'
  }; // interface Campaign from '@elasticemail/elasticemail-client-ts-axios'
};
Create a function calling campaignsPost method from the API to create a campaign. You may include console logs called when the response comes back. In case of error it will display error details, otherwise it will display a success message and chosen details about the newly created campaign.
const addCampaign = (newCampaign: Campaign): void => {
    campaignsApi.campaignsPost(newCampaign).then((response) => {
        console.log('API called successfully.');
        console.log(response.data);
    }).catch((error) => {
        console.error(error);
    });
}
And finally, call addCampaign function with proper arguments:
addCampaign(newCampaign);
Load Campaign List
To load details about a campaign list in your account using the Typescript Axios library, you will need Access Level: ViewCampaigns. Mind that when using Elastic Email, when you send an email to any group of contacts, we call it a “campaign”.
To load a campaign, put the following code into your file.
Load library using the following line:
import { Configuration, CampaignsApi } from '@elasticemail/elasticemail-client-ts-axios';
Create config including your apikey:
const config = new Configuration({
    apiKey: "YOUR_API_KEY"
});
Create an instance of CampaignsApi that will be used to load campaign details.
const campaignsApi = new CampaignsApi(config);
Specify campaign name.
Find out more by checking our API's documentation.
const campaignName = "example"; // string
Create a function calling campaignsByNameGet method from the API to load campaign details. You may include console logs called when the response comes back. In case of error it will display error details, otherwise it will display a success message and chosen details about the newly created campaign.
const loadCampaign = (campaignName: string): void => {
    campaignsApi.campaignsByNameGet(campaignName).then((response) => {
        console.log('API called successfully.');
        console.log(response.data);
    }).catch((error) => {
        console.error(error);
    });
};
And finally, call loadCampaign function with proper arguments:
loadCampaign(campaignName);
Update Campaign
To update existing campaigns in your account using the Typescript Axios library, you will need Access Level: ModifyCampaigns. Mind that when using Elastic Email, when you send an email to any group of contacts, we call it a “campaign”.
To update a campaign, put the following code into your file.
Load library using the following line:
import { Configuration, CampaignsApi, Campaign } from '@elasticemail/elasticemail-client-ts-axios';
Create config including your apikey:
const config = new Configuration({
    apiKey: "YOUR_API_KEY"
});
Create an instance of CampaignsApi that will be used to update campaign details.
const campaignsApi = new CampaignsApi(config);
Specify name of the campaign you want to update.
Find out more by checking our API's documentation.
const campaignName = "example"; // string
Create a campaign object to put in place of a current version:
- Name: defines campaign name by which you can identify it later
- Recipients: define your audience
- Content: define your message details
- Status: define the status in which campaign should be created
Send will be triggered immediately or postponed, depending on given options. Because we define Status as Draft, so in this case it will be postponed and campaign will be added to drafts.
const updatedCampaign = {
    Name: 'Updated example campaign',
    Recipients: {
      ListNames: ["my list name"],
      SegmentNames: null,
    },
    Content: [{
      From: 'myemail@address.com',
      ReplyTo: 'myemail@address.com',
      TemplateName: "your_template",
      Subject: 'Updated campaign'
    }],
    Status: "selected_status"
}; // interface Campaign from '@elasticemail/elasticemail-client-ts-axios'
Create a function calling campaignsByNamePut method from the API to update campaign details. You may include console logs called when the response comes back. In case of error it will display error details, otherwise it will display a success message and chosen details about the newly created campaign.
const updateCampaign = (campaignName: string, updatedCampaign: Campaign): void => {
  campaignsApi.campaignsByNamePut(campaignName, updatedCampaign).then((response) => {
      console.log('API called successfully.');
      console.log(response.data);
  }).catch((error) => {
      console.error(error);
  });
};
And finally, call updateCampaign function with proper arguments:
updateCampaign(campaignName, updatedCampaign)
Delete Campaign
To delete an existing campaign, you will need Access Level: ModifyCampaigns. Mind that when using Elastic Email, when you send an email to any group of contacts, we call it a “campaign”.
To delete a campaign, put the following code into your file.
Load library using the following line:
import { Configuration, CampaignsApi } from '@elasticemail/elasticemail-client-ts-axios';
Create config including your apikey:
<!-- wp:paragraph -->
<p>});</p>
<!-- /wp:paragraph -->
Create an instance of CampaignsApi that will be used to remove the campaign.
const campaignsApi = new CampaignsApi(config);
Specify the campaign name.
Find out more by checking our API's documentation.
const campaignName = "example"; // string
Create a function calling campaignsByNameDelete method from the API to delete campaigns. You may include console logs called when the response comes back. In case of error it will display error details, otherwise it will display a success message and chosen details about the newly created campaign.
const deleteCampaign = (campaignName: string): void => {
    campaignsApi.campaignsByNameDelete(campaignName).then((response) => {
        console.log('API called successfully.');
        console.log(response.data);
    }).catch((error) => {
        console.error(error);
    });
};
And finally, call deleteCampaign function with proper arguments:
deleteCampaign(campaignName);
Tracking
In this section, we will walk you through the steps of managing actions related to email tracking. You will get to know how to load delivery and campaign statistics from your account using the Typescript Axios library.
Load Statistics
To load delivery statistics from your account, you will need Access Level: ViewReports.
Put the following code into your file.
Load library using the line:
import { Configuration, StatisticsApi } from '@elasticemail/elasticemail-client-ts-axios';
Create config including your apikey:
const config = new Configuration({
    apiKey: "YOUR_API_KEY"
});
Create an instance of StatisticsApi that will be used to load basic statistics.
const statisticsApi = new StatisticsApi(config);
Specify the date range from which you want to get a report:
- from date
- to date – optional
Find out more by checking our API's documentation.
const fromDate = new Date('2015-01-01').toJSON(); // string
const toDate = new Date('2022-01-01').toJSON(); // string or null
Create a function calling statisticsGet method from the API to load statistics. You may include console logs called when the response comes back. In case of error it will display error details, otherwise it will display a success message and chosen details about the newly created campaign.
const loadStatistics = (fromDate: string, toDate?: string): void => {
    statisticsApi.statisticsGet(fromDate, toDate).then((response) => {
        console.log('API called successfully.');
        console.log(response.data);
    }).catch((error) => {
        console.error(error);
    });
};
And finally, call loadStatistics function with proper arguments:
loadStatistics(fromDate, toDate);
Load Channels Statistics
To load statistics for each channel from your account, you will need Access Level: ViewChannels.
Put the following code into your file.
Load library using the following line:
import { Configuration, StatisticsApi } from '@elasticemail/elasticemail-client-ts-axios';
Create config including your apikey:
const config = new Configuration({
    apiKey: "YOUR_API_KEY"
});
Create an instance of StatisticsApi that will be used to load campaign statistics.
const statisticsApi = new StatisticsApi(config);
Specify report pagination options:
- limit – maximum returned items, limit = 0 means to return everything till the end of the list
- offset – how many items should be skipped from begging
Find out more by checking our API's documentation.
This example will show how to fetch information about your all campaigns.
const limit = 0; // number
const offset = 0; // number
Create a function calling statisticsCampaignsGet method from the API to load campaigns statistics. You may include console logs called when the response comes back. In case of error it will display error details, otherwise it will display a success message and chosen details about the newly created campaign.
const loadCampaignsStats = (limit: number, offset: number): void => {
    statisticsApi.statisticsCampaignsGet(limit, offset).then((response) => {
        console.log('API called successfully.');
        console.log(response.data);
    }).catch((error) => {
        console.error(error);
    });
};
And finally, call loadCampaignsStats function with proper arguments:
loadCampaignsStats(limit, offset);
Load Campaigns Stats
To load statistics for each email campaign from your account, you will need Access Level: ViewChannels.
Put the following code into your file.
Load library using the following line:
import { Configuration, StatisticsApi } from '@elasticemail/elasticemail-client-ts-axios';
Create config including your apikey:
const config = new Configuration({
    apiKey: "YOUR_API_KEY"
});
Create an instance of StatisticsApi that will be used to load channel statistics.
const statisticsApi = new StatisticsApi(config);
Specify report pagination options:
- limit – maximum returned items,
limit = 0means to return everything till the end of the list - offset – how many items should be skipped from begging
Find out more by checking our API's documentation.
This example will show how to fetch information about your all campaigns.
const limit = 0; // number
const offset = 0; // number
Create a function calling statisticsChannelsGet method from the API to load channel statistics. You may include console logs called when the response comes back. In case of error it will display error details, otherwise it will display a success message and chosen details about the newly created campaign.
const loadChannelsStats = (limit: number, offset: number): void => {
    statisticsApi.statisticsChannelsGet(limit, offset).then((response) => {
        console.log('API called successfully.');
        console.log(response.data);
    }).catch((error) => {
        console.error(error);
    });
};
And finally, call loadChannelsStats function with proper arguments:
loadChannelsStats(limit, offset);
Ready to get started?
Tens of thousands of companies around the world already send their emails with Elastic Email. Join them and discover your own email superpowers.
Try for Free
100 emails/day free
Instant setup
No credit card required