
Email Sending
Introduction
![]()
Elastic Email Java API Library
Introduction
When you integrate Elastic Email with your application, you can interact with your Elastic Email account directly by our API. You can easily integrate your email flow, manage your contacts and templates, send emails, and track email statistics directly from your app.
This page will help you easily integrate with Elastic Email using the Java library. You can find our whole downloadable Java repository on GitHub. You can also use our comprehensive API documentation.
Elastic Email API v4 uses REST architecture, which allows you to perform various code actions, including directly through your app.
The maximum email size of your entire message or message + attachment cannot exceed 20MB.
The attachment format is the file’s content as a byte array or a Base64 string.
The maximum number of recipients has no limit for one campaign. It depends on the pricing plan.
The API has a limit of 20 concurrent connections and a hard timeout of 600 seconds per request.
On this page, you will find how to authenticate your application and what the requirements for the integration are. You will be also provided with a quick start guide on how to start using API, followed by code samples.
Authentication
To provide valid authentication and start using our API, you will need an API key. To generate your API key, enter settings on your Elastic Email account and go to Settings -> Manage API Keys -> Create or you can also click on the link:
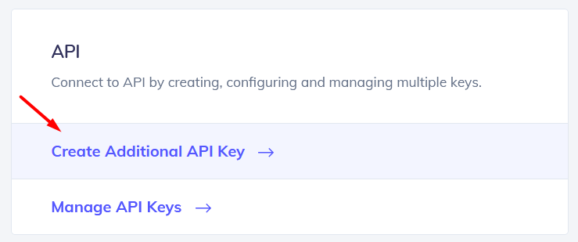
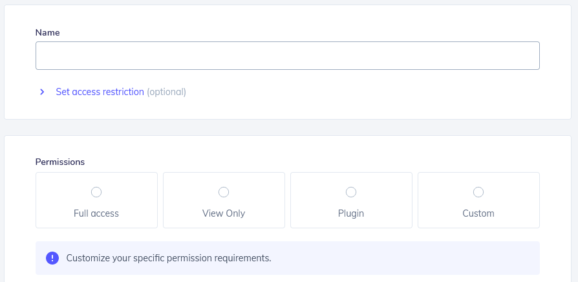
At this point, you can set custom permissions and optional access for your API key.
Security tip: The restriction forces the API Key to work only with an IP or IP range that will be specified in this field.
Once you create your API key, keep it safe as it will be used for every API call you make in order to identify you and confirm your account’s credentials. You can create either up to 15 or an unlimited amount of API keys based on your pricing plan.
Your API key should be sent inside the header with the parameter name ‘x-elasticemail-apikey’ and your API key as a value.
Installation and Usage
Installation
Our official downloadable Java library is available on GitHub.
To install the API client library to your local Maven repository, simply execute:
To deploy it to a remote Maven repository instead, configure the settings of the repository and execute:
Refer to the OSSRH Guide for more information.
Maven users
Add this dependency to your project's POM:
<dependency>
  <groupId>com.elasticemail</groupId>
  <artifactId>elasticemail</artifactId>
  <version>4.1.0</version>
  <scope>compile</scope>
</dependency>
Gradle users
Add this dependency to your project's build file:
  repositories {
    mavenCentral()     // Needed if the 'elasticemail' jar has been published to maven central.
    mavenLocal()       // Needed if the 'elasticemail' jar has been published to the local maven repo.
  }

  dependencies {
     implementation "com.elasticemail:elasticemail:4.1.0"
  }
Others
At first, generate the JAR by executing:
mvn clean package
Then manually install the following JARs:
- target/elasticemail-4.0.16.jar
- target/lib/*.jar
Please follow the installation instruction and execute the following Java code:
// Import classes:
import com.elasticemail.client.ApiClient;
import com.elasticemail.client.ApiException;
import com.elasticemail.client.Configuration;
import com.elasticemail.client.auth.*;
import com.elasticemail.client.models.*;
import com.elasticemail.api.CampaignsApi;

public class Example {
  public static void main(String[] args) {
    ApiClient defaultClient = Configuration.getDefaultApiClient();
    defaultClient.setBasePath("https://api.elasticemail.com/v4");

    // Configure API key authorization: apikey
    ApiKeyAuth apikey = (ApiKeyAuth) defaultClient.getAuthentication("apikey");
    apikey.setApiKey("YOUR API KEY");
    // Uncomment the following line to set a prefix for the API key, e.g. "Token" (defaults to null)
    //apikey.setApiKeyPrefix("Token");

    CampaignsApi apiInstance = new CampaignsApi(defaultClient);
    String name = "name_example"; // String | Name of Campaign to delete
    try {
      apiInstance.campaignsByNameDelete(name);
    } catch (ApiException e) {
      System.err.println("Exception when calling CampaignsApi#campaignsByNameDelete");
      System.err.println("Status code: " + e.getCode());
      System.err.println("Reason: " + e.getResponseBody());
      System.err.println("Response headers: " + e.getResponseHeaders());
      e.printStackTrace();
    }
  }
}
Quick start guide
In this section, we will tell you the steps to start sending emails with our email API.
1. Register a free account
Register and activate your Elastic Email account to get access to our product.
2. Verify your domain
Follow the instructions on our settings page to verify your domain and start sending with us.
3. Create an API Key
Go to your setting to generate an API Key to add to your code later.
4. Install our libraries
Install our Java library as explained in the Installation and usage section.
5. Send your first email with API
Now it’s time to send your first test email with API to make sure that everything is set up correctly after downloading the library and the authentication process.
// Import classes:
import com.elasticemail.client.ApiClient;
import com.elasticemail.client.ApiException;
import com.elasticemail.client.Configuration;
import com.elasticemail.client.auth.*;
import com.elasticemail.client.models.*;
import com.elasticemail.api.EmailsApi;
public class Example {
  public static void main(String[] args) {
    ApiClient defaultClient = Configuration.getDefaultApiClient();
    defaultClient.setBasePath("https://api.elasticemail.com/v4");

    // Configure API key authorization: apikey
    ApiKeyAuth apikey = (ApiKeyAuth) defaultClient.getAuthentication("apikey");
    apikey.setApiKey("YOUR API KEY");
    // Uncomment the following line to set a prefix for the API key, e.g. "Token" (defaults to null)
    //apikey.setApiKeyPrefix("Token");
    EmailsApi apiInstance = new EmailsApi(defaultClient);
    EmailMessageData emailMessageData = new EmailMessageData(); // EmailMessageData | Email data
    try {
      EmailSend result = apiInstance.emailsPost(emailMessageData);
      System.out.println(result);
    } catch (ApiException e) {
      System.err.println("Exception when calling EmailsApi#emailsPost");
      System.err.println("Status code: " + e.getCode());
      System.err.println("Reason: " + e.getResponseBody());
      System.err.println("Response headers: " + e.getResponseHeaders());
      e.printStackTrace();
    }
  }
}
Ready to get started?
Tens of thousands of companies around the world already send their emails with Elastic Email. Join them and discover your own email superpowers.