We’re really excited to share with you that we have just released a new feature - Paid Newsletters. We’ve been helping you send newsletters and other email marketing campaigns for years, and now we’ve made it possible for you to monetize your amazing emails too. Earn money from offering premium content, exclusive insights, behind-the-scenes materials, or even online courses and selling it with Elastic Email. Let us tell you more about this extraordinary feature.
Table of Contents
- TL;DR
- Paid Newsletters - how does it work?
- Paid Newsletters - access and cost
- Paid Newsletters - the flow
- Paid Newsletters - list and subscription management
- Enjoy our new feature!
- FAQ
TL;DR
Paid Newsletters is an Elastic Email feature that lets creators, educators, and businesses charge subscribers for exclusive email content. You build a sales landing page with your newsletter name, price, currency, and billing frequency, connect a Stripe account to handle payments, and paying subscribers are automatically added to a dedicated contact list so only they receive your premium campaigns. It supports seven currencies (USD, EUR, PLN, GBP, CAD, AUD, NZD), requires no separate domain (pages are hosted free on myelasticemail.com), and has no extra platform fee beyond your Elastic Email plan - you only pay Stripe's standard transaction fees. Building the flow is available on the free and Starter plans, but publishing and actually selling requires the Email Marketing Pro plan.
Paid Newsletters - how does it work?
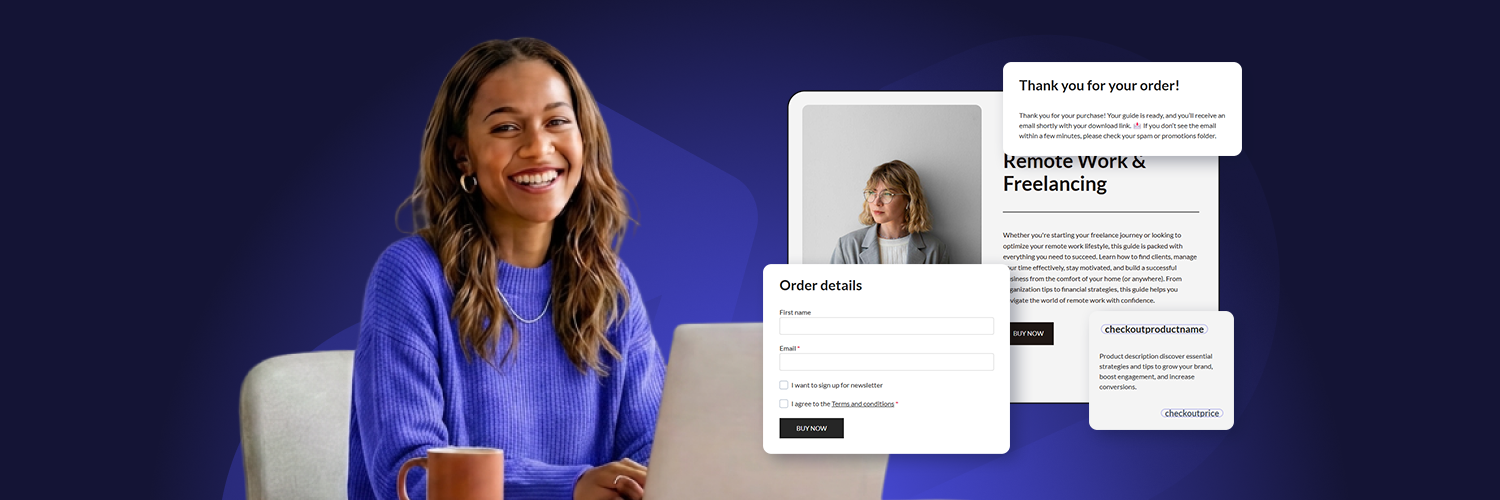
Paid Newsletters allow creators, influencers, industry leaders, and email marketers to monetize their email content by offering subscription-based access to their campaigns. It means that if you send email newsletters to your subscribers and want to regularly earn money from them, you can offer paid newsletters with exclusive content for those contacts who are willing to pay for it.
Using Elastic Email, you’ll be able to create a dedicated sales landing page, describing the newsletter and its benefits, as well as the subscription price. When someone clicks to buy it, they will be redirected to Stripe, where they can complete the payment process. After a successful payment, the subscriber will see a confirmation page and be automatically added to a dedicated list in your Elastic Email account. You will then be able to create and send campaigns specifically to that list, ensuring that only paying subscribers receive your newsletter.
Who can offer a paid newsletter? The possibilities are endless. If you’re a content creator or solopreneur, you can offer early access or exclusive content, like insights, reports, frameworks, templates, and behind-the-scenes materials. Educators and trainers can deliver mini-courses, tutorials, or advanced learning materials. Even if you run a business, you can find a use for paid newsletters. You can send premium versions of existing content, ad-free experiences, advanced tips, or industry insights. Actually, anyone with specialized knowledge can use paid newsletters to monetize their expertise.
Paid Newsletters - access and cost
The Paid Newsletters feature is available in the Email Marketing Pro plan. If you use the free version of Email Marketing, or if you subscribed to the Email Marketing Starter Plan, Paid Newsletters are available, but without the permission to publish the generated sales page. It means you will be allowed to create a landing page, but won’t be able to publish it.
We do not charge you any additional fees for Paid Newsletters and any sold digital products. The only cost will be the cost of the user plan. But you will be charged a fee directly from Stripe for each transaction. To check the fees, visit the Stripe pricing page.
Paid Newsletters - the flow
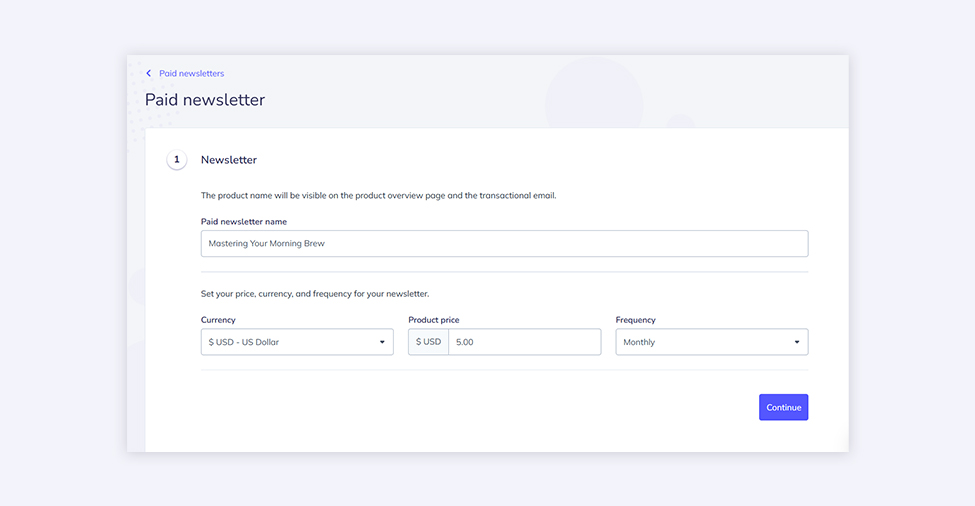
1. Newsletter name, price, and currency
In the first step, you define your paid newsletter name, as well as set the price, currency, and payment frequency. You can choose among seven currencies - US dollar (USD), Euro (EUR), Polish Zloty (PLN), Pound Sterling (GBP), Canadian Dollar (CAD), Australian Dollar (AUD), and New Zealand Dollar (NZD).
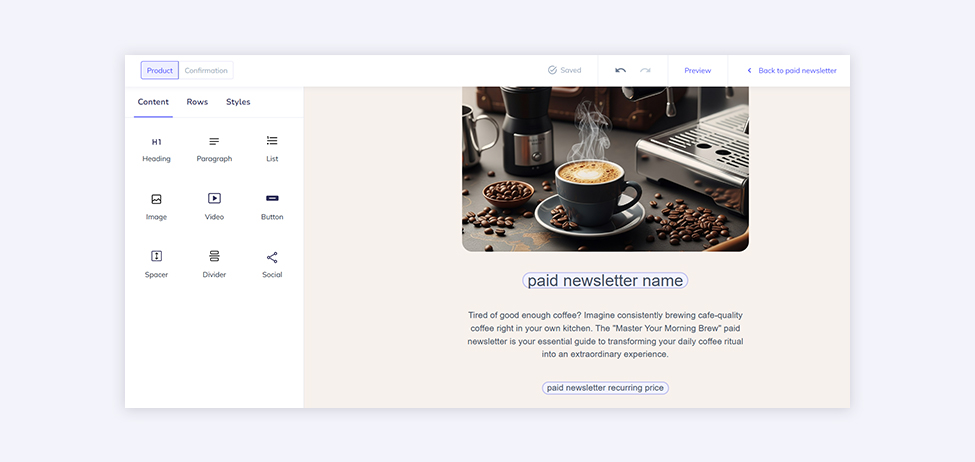
2. Paid newsletter landing page design
Then, it’s time to select and design a landing page that will be used to promote and sell your newsletter subscription. You can choose one of many beautiful landing page templates from our gallery and customize it your way. All these templates include helpful merge fields like {{Paid Newsletter Name}}, {{Paid Newsletter Recurring Price}}, or {{Paid Newsletter Terms URL}}. Merge fields are special tags used in email templates that will be replaced with appropriate content after sending an email.
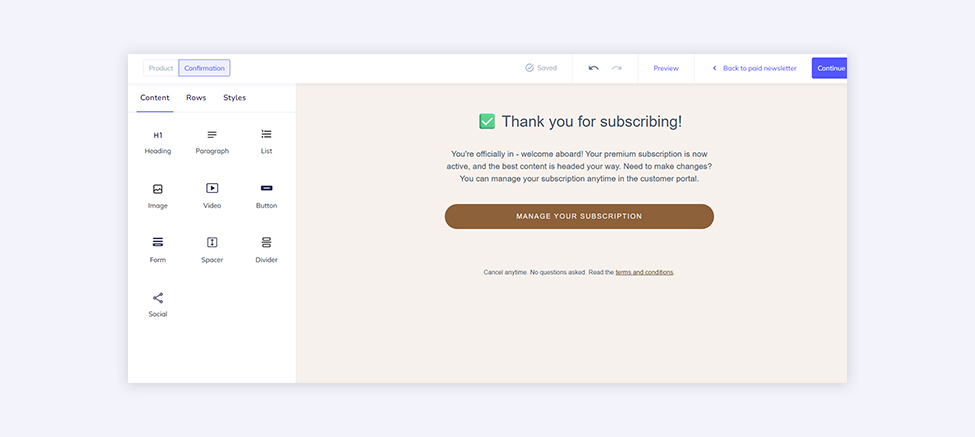
3. Confirmation page design
The next step is to create the confirmation page that the subscribers will see once they complete the purchase.
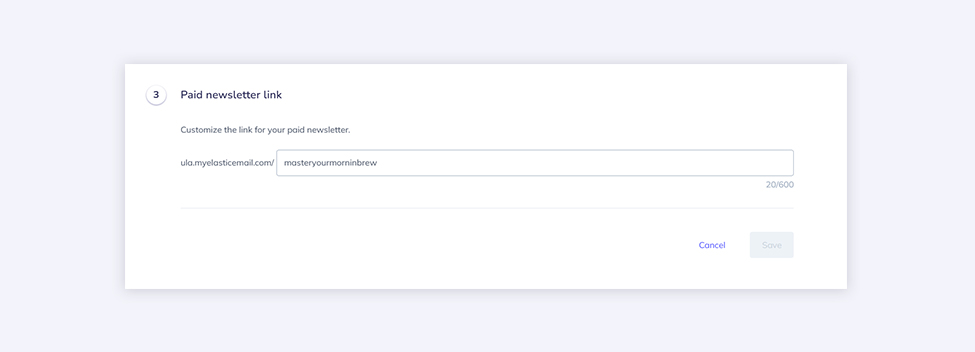
4. Paid newsletter link
Now, it’s time to create your paid newsletter link. You don’t even need to own a domain. Every landing page will be created within the myelasticemail.com domain. You need to add what will appear at the end of the link, e.g., /paid-newsletter.
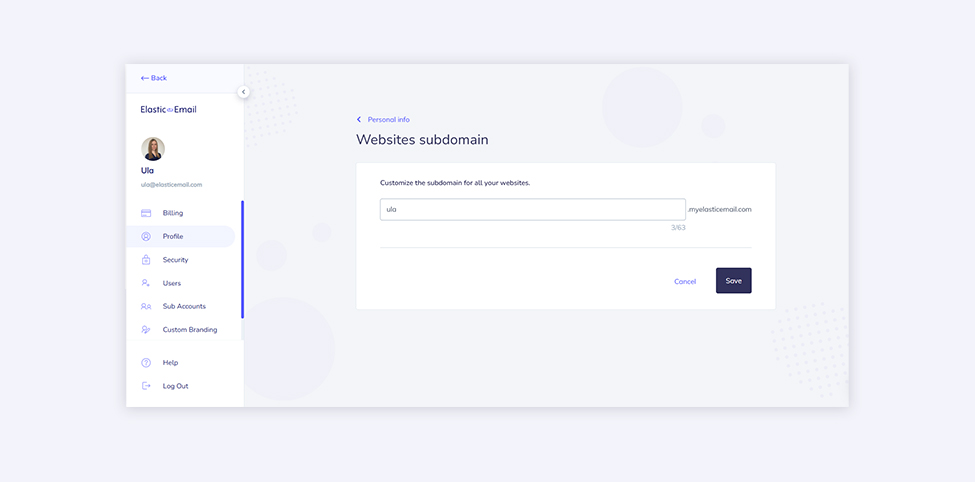
The subdomain, meaning the prefix that you want to appear at the beginning of the URL, can be set up at your account level and will be applied to all your landing pages (Paid Newsletters, Checkouts, landing pages or even for a mix of Checkouts and landing pages to create your own shop with digital products). All you need to do is enter your Account settings->Profile. Below your personal data, logo and brand colors settings, you can find the section about Website subdomains. You can add the domain prefix there and edit anytime.
5. Social share preview
You can also customize how your landing page appears when shared on social media and messaging apps. Set your title and description, and upload an image to create an engaging preview that captures attention and drives clicks.

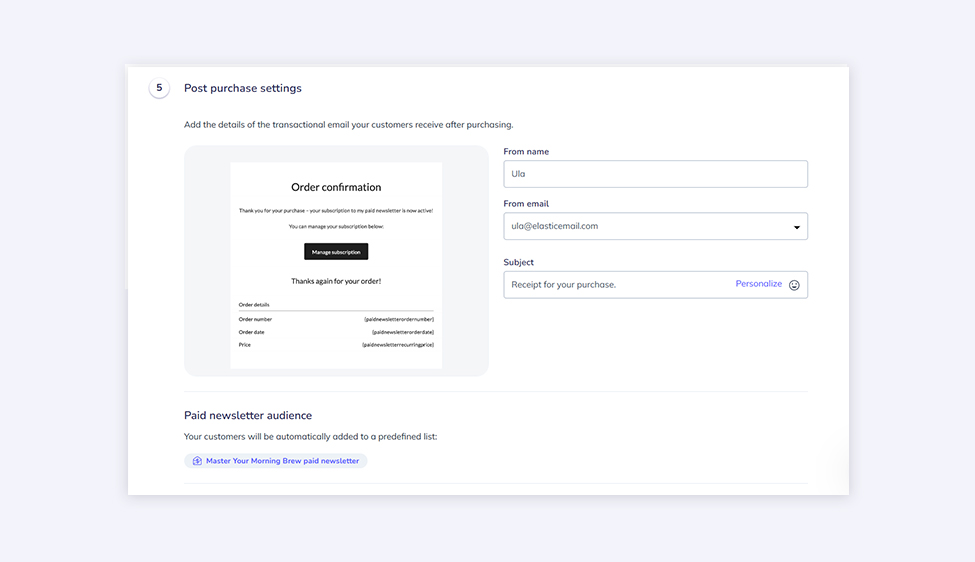
6. Post-purchase setting
In this step, you configure the details of the transactional email your customers receive after purchasing your paid newsletter subscription. You don’t need to connect to our API or SMTP relay to send transactional email. Everything is automated on our side to make your selling process smooth and seamless.
7. Connecting with Stripe and setting the Terms and Conditions
The last two important elements for Paid Newsletters to function are connecting your Elastic Email account with Stripe and setting up Terms and Conditions. As for the former, you need to create a Stripe account and link it to your Elastic Email account. To do this in our dashboard, you need to configure your payment settings in the Profile section of your Profile settings. You can either do it at the very beginning of creating your paid newsletter flow or as the last step, right before publishing your landing page.
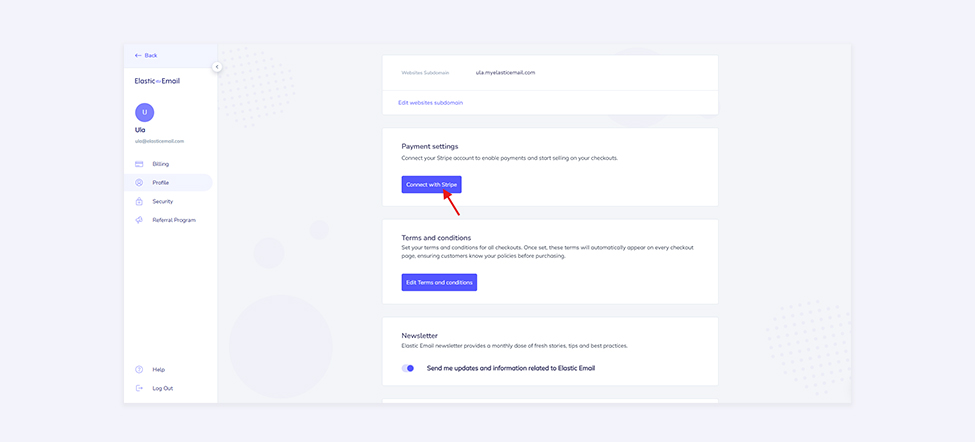
As for the terms and conditions, you need to define them for your subscribers so that they know the exact rules of your paid subscription. We’ve provided predefined terms as an example of what they might look like. You can edit them and adjust according to your needs. Just like with payment settings, you can set your terms in your Profile settings. As we mentioned before, we created a merge field {{Paid Newsletter Terms URL}} that links to your terms in your paid newsletter landing page.
Enjoying this content?


Paid Newsletters - list and subscription management
As we mentioned above, every paid newsletter will have an automatically created dedicated contact list with the name of your paid newsletter. This list will store subscribers who have successfully purchased the newsletter subscription. If a subscriber decides to cancel their subscription, they will no longer appear on this list as it is automatically updated. You cannot delete a paid newsletter list. Only deleting the paid newsletter will result in removing the list associated with that newsletter.
As for the subscription management, there are two main ways for a customer to be unsubscribed from a paid newsletter - through Stripe-hosted Customer Portal and unsubscribe link in their emails. The first option appears after the subscription purchase. The subscriber gains access to the Customer Portal where they can manage their subscription. As for the second option, every email campaign subscribers receive will include an unsubscribe link in case someone decides to opt out of your paid newsletter.
Enjoy our new feature!
We hope we encouraged you to try our brand-new feature - Paid Newsletters. It’s time to start monetizing your valuable and exclusive content, and you can start doing it today, with Elastic Email. Create attractive landing pages and start earning money smoothly and securely. If you have any further questions or need assistance with setting up your paid newsletter flows, we’re more than happy to help you. Contact our customer support team at support@elasticemail.com or via live chat, which you can find in the bottom right corner of our website and platform. Enjoy!
FAQ
What is Elastic Email's Paid Newsletters feature?
It's a built-in tool that lets you sell subscription access to premium email content. Subscribers pay through Stripe, are automatically added to a dedicated contact list, and only they receive the paid campaigns you send to that list.
What plan do I need to use Paid Newsletters?
You can build the entire paid newsletter flow for free, including on the Starter plan, but you can't publish the sales page or start selling until you upgrade to the Email Marketing Pro plan.
Does Elastic Email charge extra fees for Paid Newsletters?
No. There's no additional fee beyond the cost of your Elastic Email plan. Stripe charges its own standard transaction fee on each sale, which you can check on Stripe's pricing page.
What currencies does Paid Newsletters support?
Seven: US Dollar, Euro, Polish Zloty, Pound Sterling, Canadian Dollar, Australian Dollar, and New Zealand Dollar.
Do I need my own domain to sell a paid newsletter?
No. Every paid newsletter landing page is hosted on a free myelasticemail.com subdomain that you can customize, e.g., yourname.myelasticemail.com/newsletter-name.
Do I need a Stripe account to use Paid Newsletters?
Yes. Connecting a Stripe account is required to process subscriber payments. You can connect it either at the start of building your paid newsletter flow or as the final step before publishing.
How do subscribers cancel a paid newsletter subscription?
Two ways: through the Stripe-hosted Customer Portal, which subscribers can access after purchase, or via the unsubscribe link included in every email campaign they receive.
Can I delete a paid newsletter's contact list?
Not directly. The dedicated subscriber list is automatically created and managed for each paid newsletter, and it's only removed if you delete the paid newsletter itself.

Ula Chwesiuk
Ula is a content creator at Elastic Email. She is passionate about marketing, creative writing and language learning. Outside of work, Ula likes to travel, try new recipes and go to concerts.