If your goal involves sending emails directly from your hosting or domain, you might initially need to arrange an SMTP connection. While this task doesn't require coding proficiency and isn't excessively time-consuming, newcomers might encounter some difficulties during their initial setup. Therefore, we'll demonstrate various plugins and tool examples to ensure proper setup.
SMTP connection feature is available in both products: marketing and API.
Table of Contents
Why do you need an SMTP connection?
What is SMTP? It's an abbreviation for Simple Mail Transfer Protocol, which defines the processes and principles for sending, receiving, and transferring emails. Although it lacks the complexity of an API, SMTP can be an excellent option for users seeking an uncomplicated setup, particularly when integrating with existing applications or CRM platforms. If you are uncertain about deciding between an email API or SMTP, read this article.
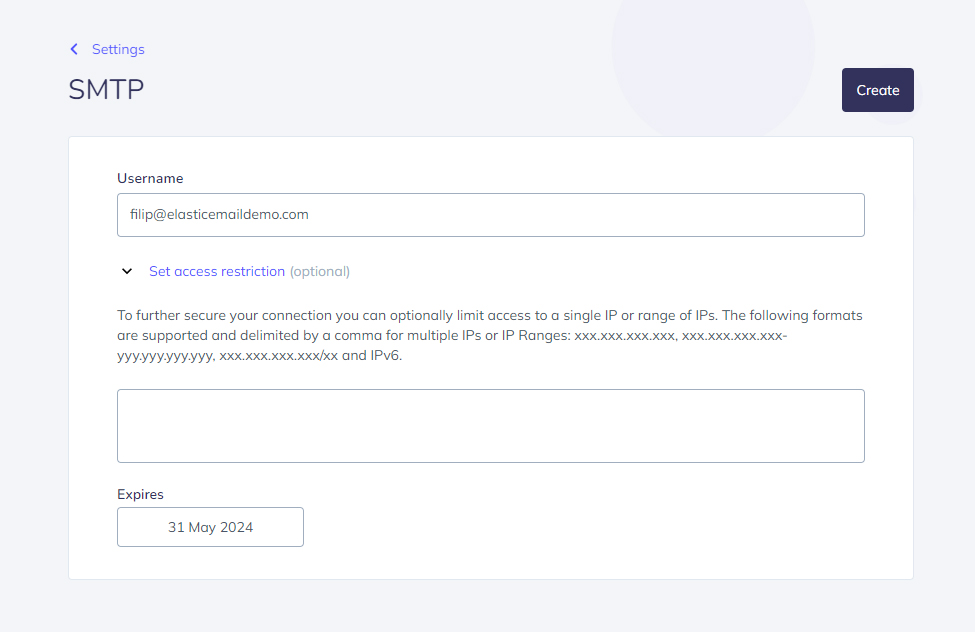
First, you'll need to access the "Settings" section and generate SMTP credentials. Additionally, ensure that you've previously verified your domain. Input a valid, unique email address as a username and consider setting additional IP restrictions or an expiration date. Once you've clicked "create," your credentials will be generated - be sure to save your password, as it will no longer be accessible once the window is closed.
A video guide is available for those who prefer visual instructions. It offers a step-by-step walkthrough on creating SMTP credentials and using them with SMTP Mailer.
Next, let's take a closer look at different connection possibilities. There are many different WordPress plugins that can help you set up a connection, but we will focus on the most popular ones and tools integrated with Elastic Email.
Post SMTP
Post SMTP is one the most popular plugins related to SMTP with over 400 000 active installations. If you install and activate it, you will start a built-in configurator.
There is a built-in integration with Elastic Email, but it requires an API key, not SMTP credentials. Here is how it would look:
If you want to know more about API key creation and setup, watch this video.
But you can also pick the option “other SMTP” if you want to set up a connection with SMTP credentials.
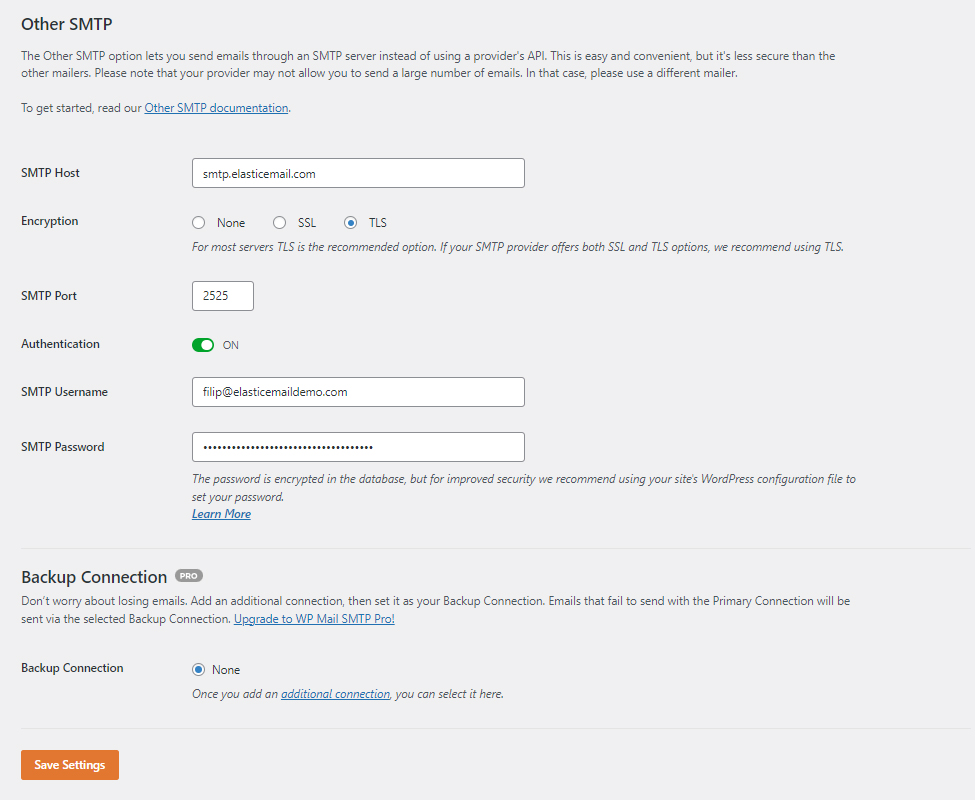
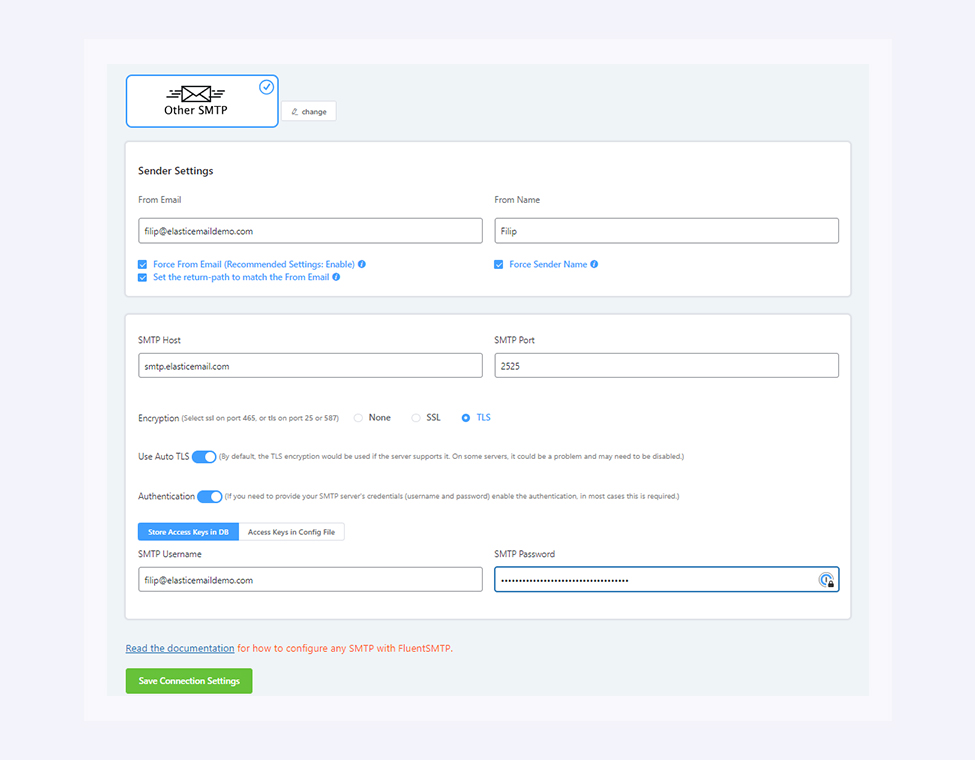
Then, input all the essential information one by one. Choose the 'From email' in line with the credentials you have created, and decide on the 'From name' that will be visible to your recipients.
The hostname and port should be assigned in accordance with the standard Elastic Email setup, which means smtp.elasticemail.com and port 2525. You can learn more about other available ports here. The username and password should be the same as your credentials.
If you are uncertain whether any other plugins or settings might overwrite your configurations, select those two options to prevent changes.
Send a test email to confirm if everything works fine.
Voila, you have just set up your SMTP connection with the Post SMTP plugin.
WP Mail SMTP
WP Mail SMTP is the most popular plugin in the market. Fortunately, the setup is similar to the previous example.
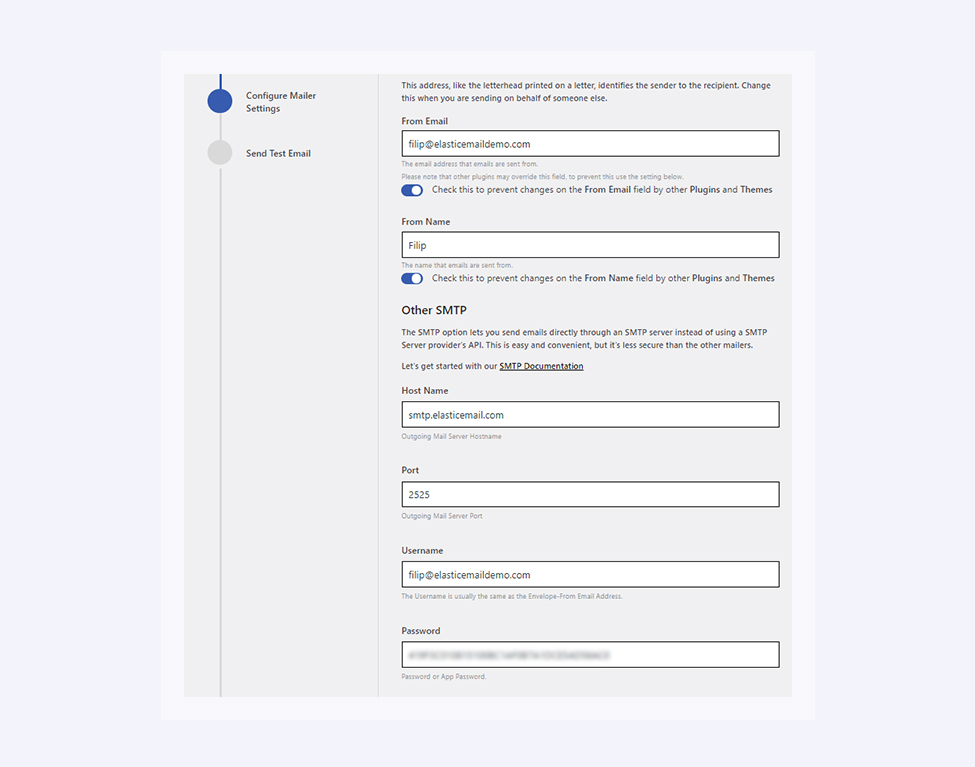
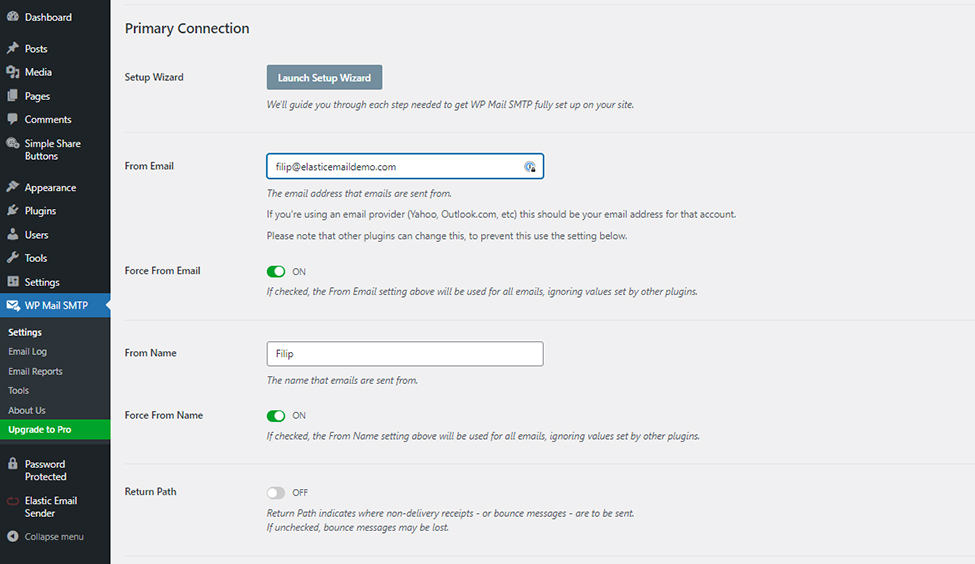
After installing and activating the plugin, we input the 'From email' and 'From name' in accordance with our verified domain. Here, we can also choose to force both options not to be overwritten by different plugins and tools.
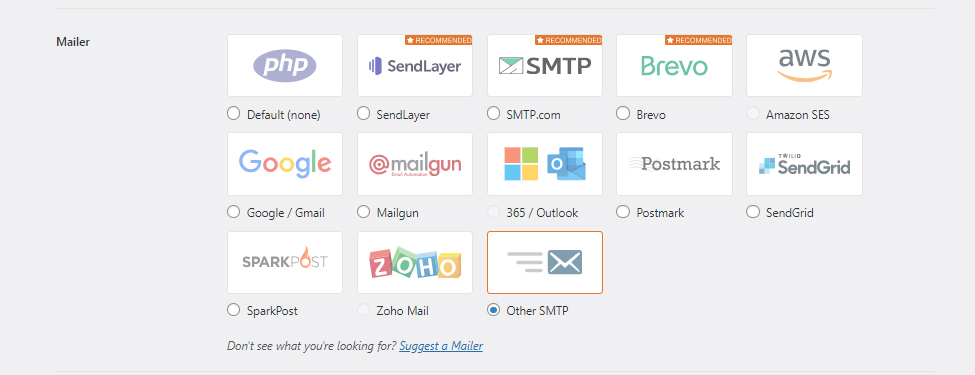
Deciding on SMTP, we choose “Other SMTP”.
Now we need to provide information about the SMTP host, encryption, and port. Let's go with smtp.elasticemail.com, TLS (although SSL is also accepted), and the standard port 2525.
Finally, we input our username and password in line with our credentials.
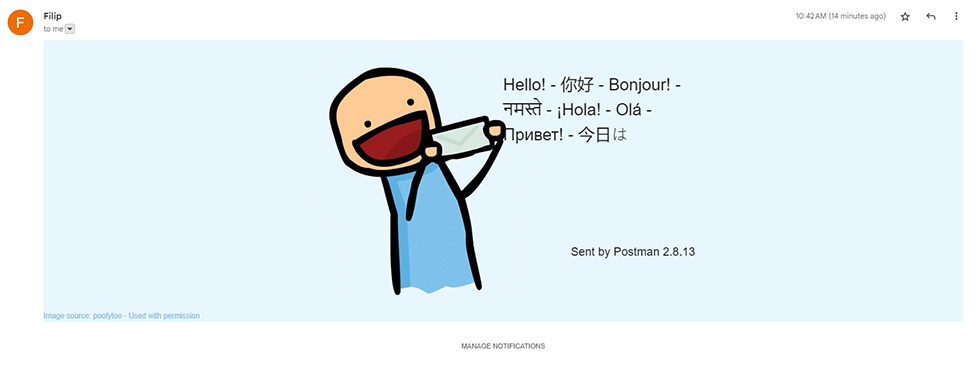
Let’s save the settings and send a test email to confirm the configuration.
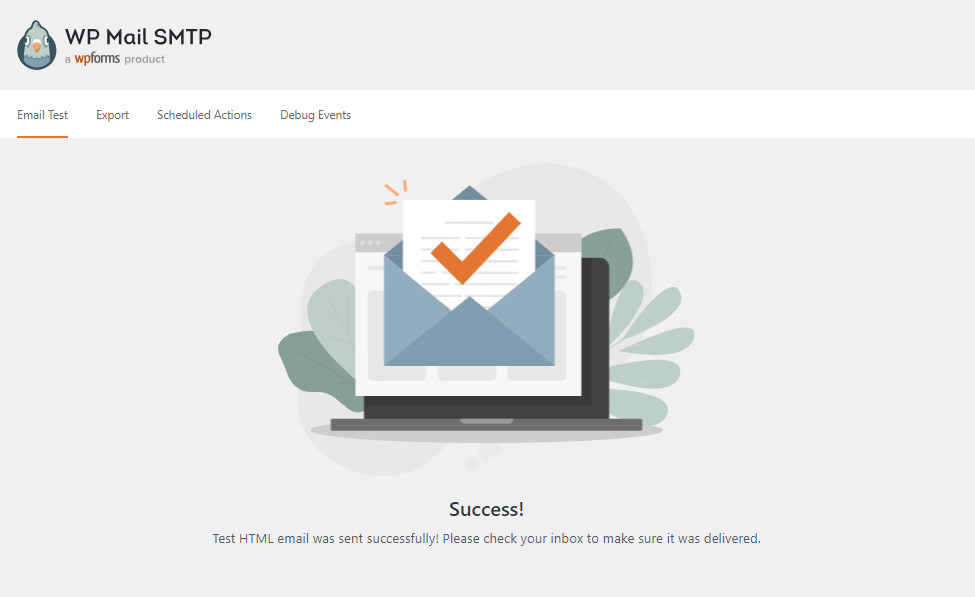
It works fine!
Fluent SMTP
Fluent CRM is a marketing automation tool dedicated to WordPress. It allows you to easily manage your leads and automated campaigns within one dashboard.
In this case, we will use the FluentSMTP plugin to set up the connection.
While there is our built-in integration, similar to Post SMTP, it requires an API key, not SMTP credentials.
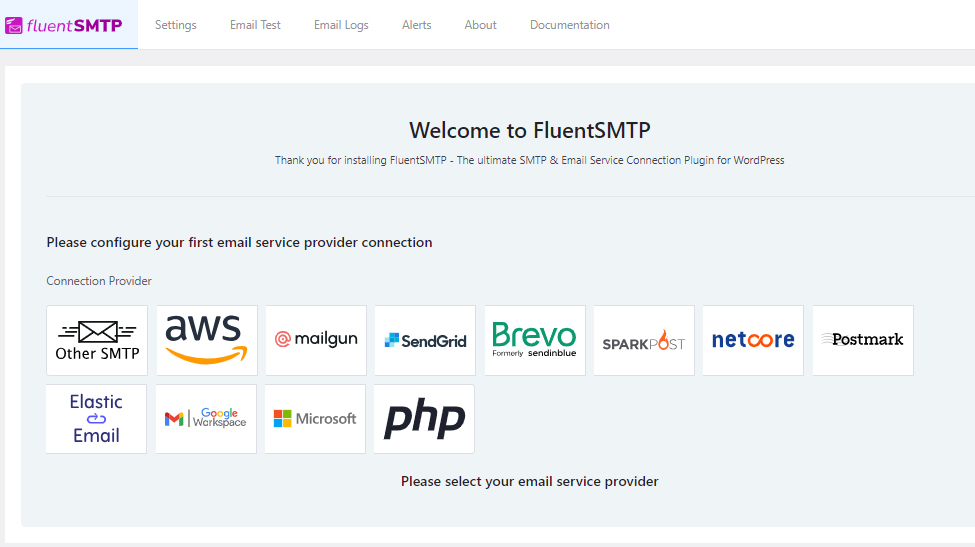
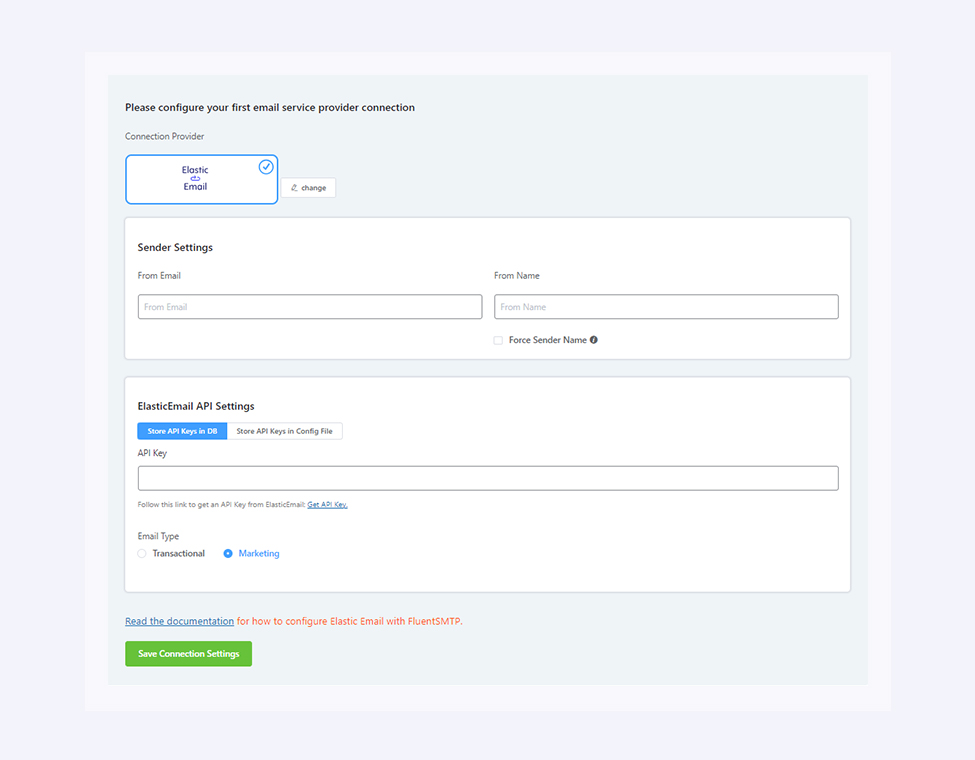
If you have generated your API key, you might want to use this option and simply provide all required details here.
We can also choose 'Other SMTP' as the connection provider to utilize SMTP credentials here. Just like before, we will configure the settings according to our credentials.
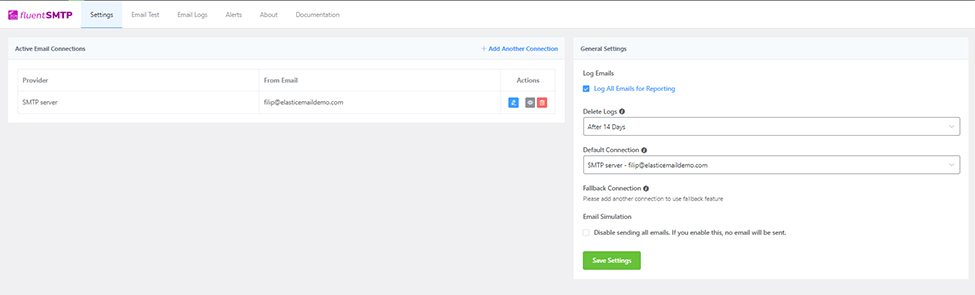
When everything is done, we can click 'Save Connection Settings' to verify everything has been configured correctly. It will create a new default SMTP server:
We can also send a test email to confirm if everything works smoothly.
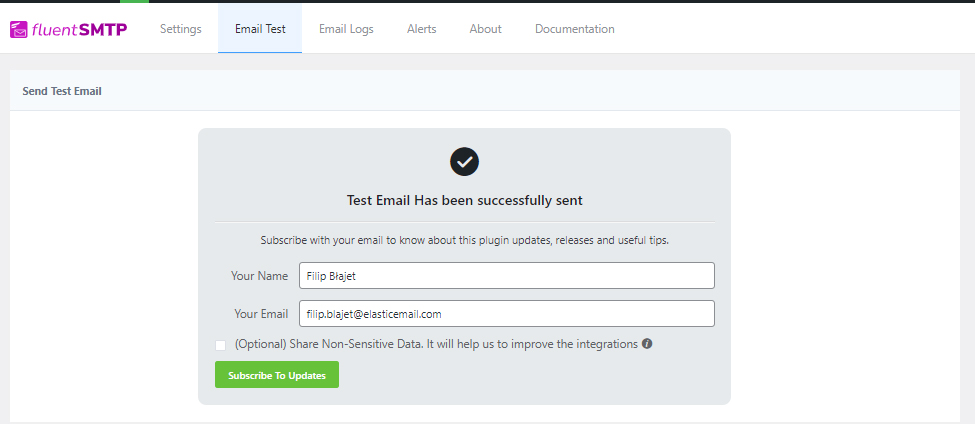
If yes, then the configuration has been finished.
Sendy
Sendy is a self-hosted email newsletter app that allows users to send bulk emails. You need to purchase the software before using it, but we will show you how to configure an SMTP connection in the demo version. Even if you can't send emails using this method, you will see how easy it is to configure Sendy with our SMTP.
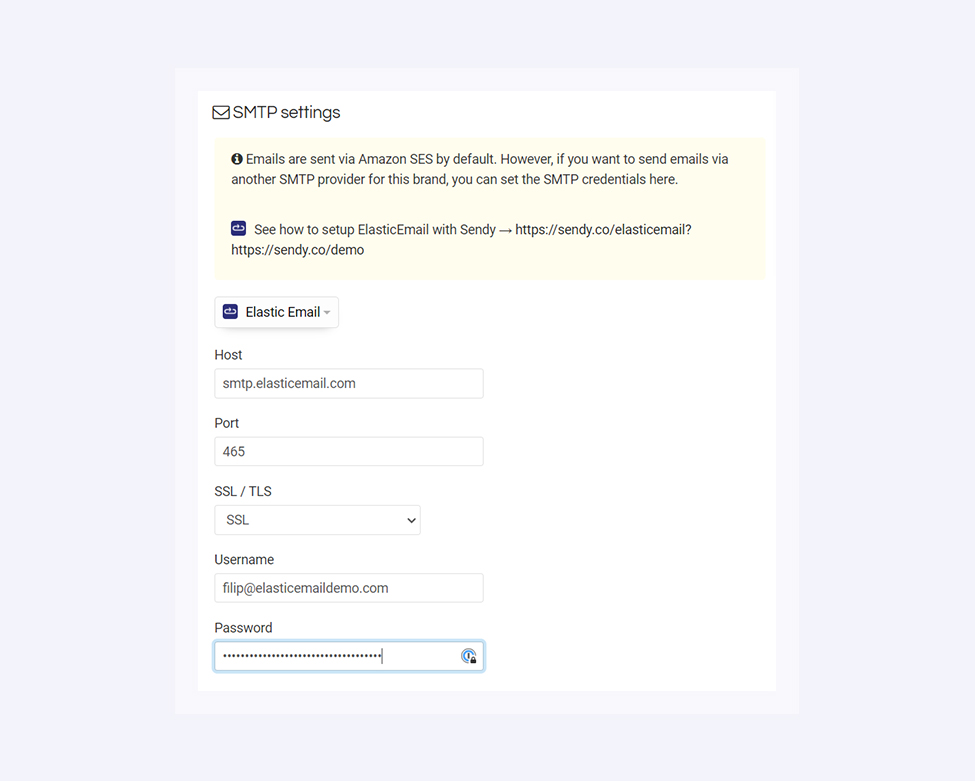
In the Demo version, we create a new brand and fill in all crucial information.
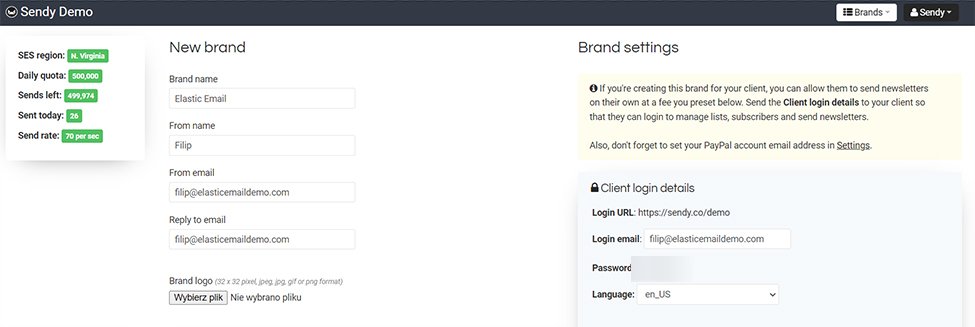
Afterward, we can select Elastic Email in the SMTP settings, and most of the data will be automatically filled in. Just make sure that you have entered a valid username and password, and that's all.
Even though it's the free version, you can easily check how simple it is to set up the connection between our integrated tools.
AcyMailing
Now let’s focus on another tool that Elastic Email is integrated with - AcyMailing.
Install the AcyMailing plugin, activate it, and navigate to the configuration area. There is a built-in integration that requires an API key (which is free to create in our app), but you can also set up an SMTP connection.
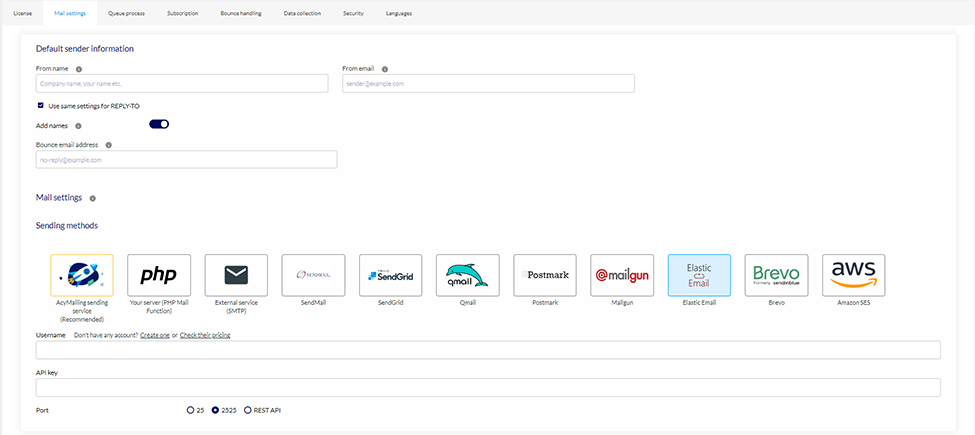
Just select the external service and input all the necessary information one by one.
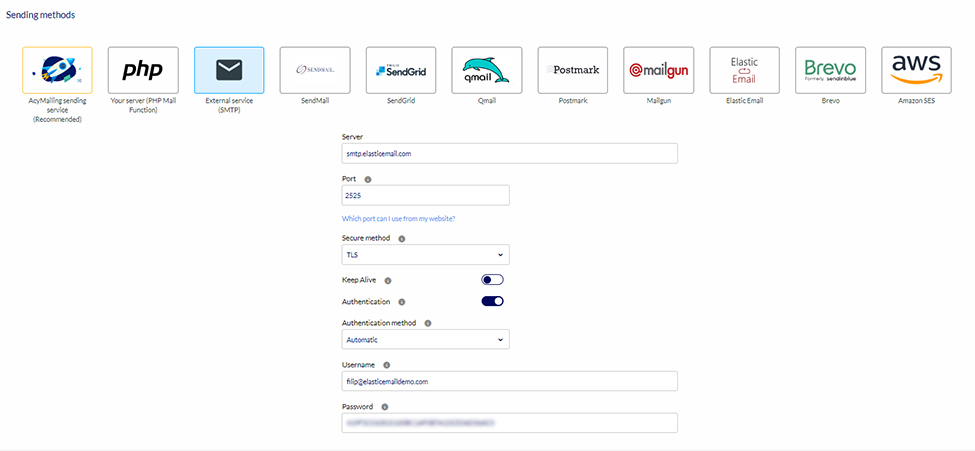
Remember to enable “Authentication” to use your credentials.
It’s good practice to send a test email to ensure the connection has been set up correctly. If you received a test message, then the configuration has been completed!
MailPoet
Mailpoet is a newsletter plugin for WordPress. You need to create your free (or paid) account to take advantage of this tool.
Then install the plugin and activate it - note that PHP and WordPress versions should be up to date.
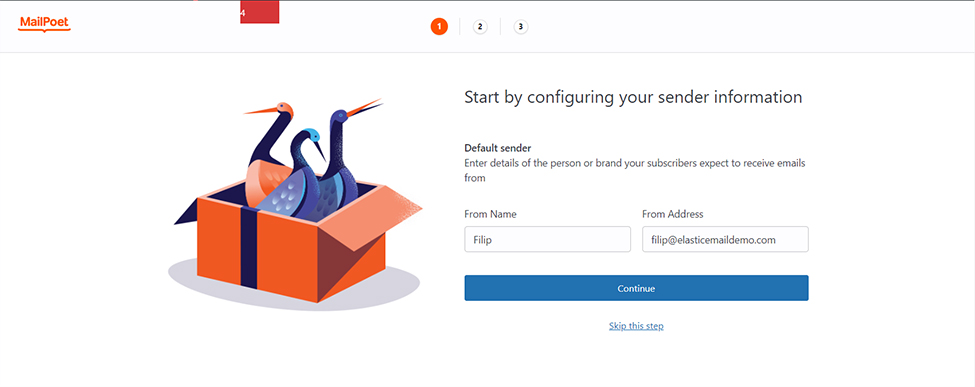
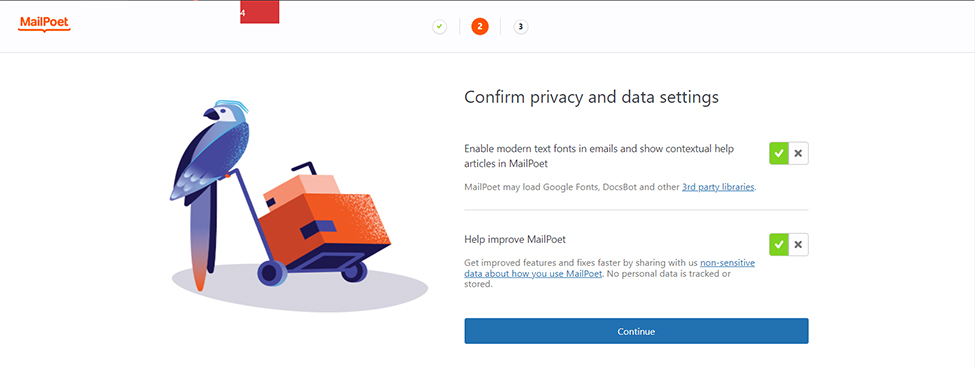
In the configurator, input all the important information and your preferences step by step.
One of the steps is connecting with your MailPoet account.
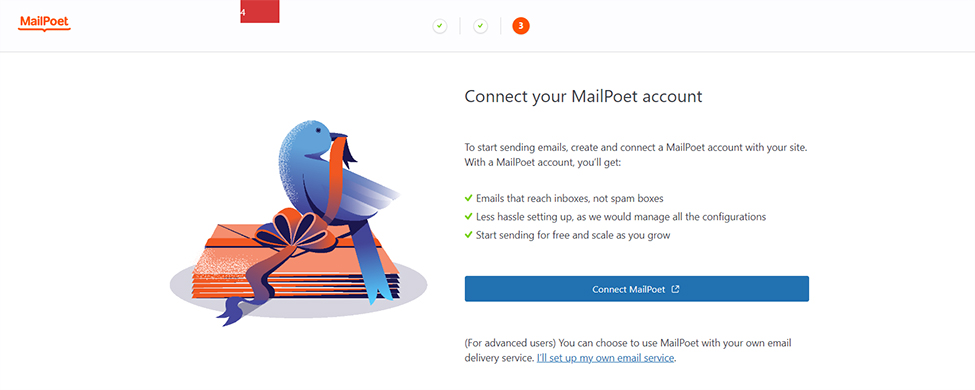
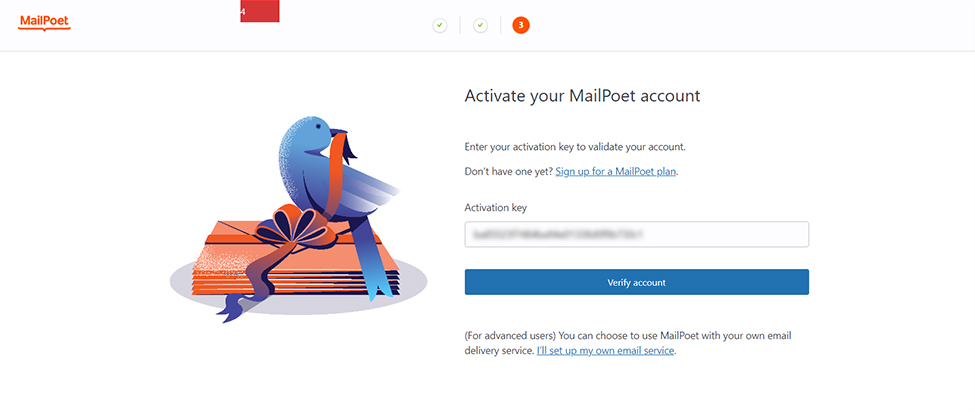
As mentioned, you can create that for free to generate an activation code.
Just copy and paste it here to finish the activation process.
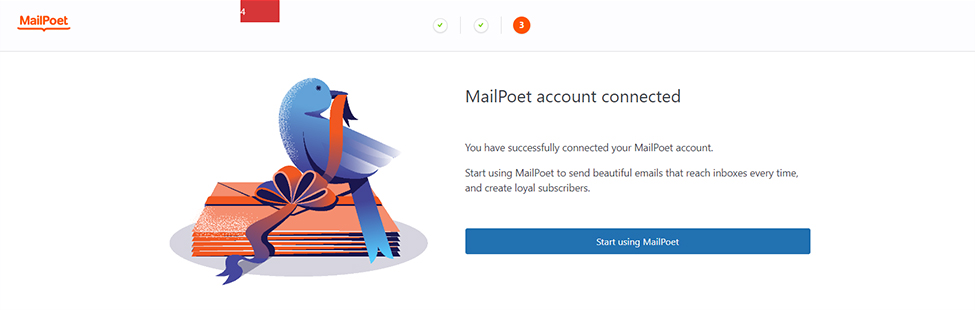
When it’s done, your account will be connected with the WordPress plugin.
Now, let's focus on SMTP. Choose 'Other' and click on 'Configure'.
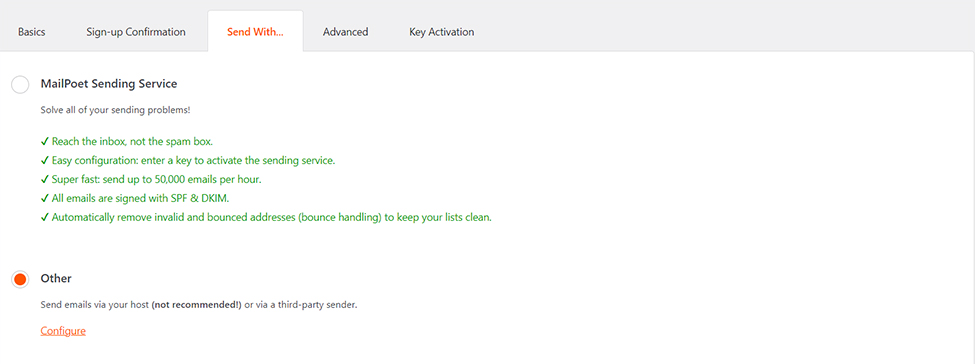
Select SMTP as the method and determine the sending frequency. All other settings should align with your credentials, beginning with the SMTP hostname and ending with the authentication method.

Now all we need to do is send a test email to make sure everything works.

That says, our job is done!
Powerful SMTP connection with WordPress
The plugins and tools mentioned serve as mere illustrations of SMTP connections accessible using our credentials. While there may be minor differences in the setup process, the overall procedure is mainly consistent. Every time, you'll need to enter the hostname, port number, and your credentials and then proceed to test its functionality.
You can find all the available integrations here. If you need an API key to make the most of them, you can learn more about creating one here.
That's all for today's guide. You can now manage setting up an SMTP connection and sending emails from your hosting or domain. I hope it's now more straightforward for you. If you have any questions regarding SMTP setup or believe an essential integration is missing, please let us know through our customer support. They are always ready to help!

Filip Blajet
Filip is a marketing specialist and content author, who spends a lot of time with data and ads. Outside of work, he loves football, binge watching tv series and travelling.