Starting out is never easy. There are many aspects you need to take into consideration including the creation of your brand, the type of service or product, and forms of communication with your customers.
One of the most important elements of setting up your own business is using the right tools that will support you. We already mentioned quite a few applications that will definitely assist you in launching your business. But, are you aware that there is a whole other level of customizing them to your needs? Not only that, but you can link certain apps so they can work together, saving you time and money. This is the power of plugins, and today we will be talking specifically about two WordPress plugins from Elastic Email. Sender and Subscribe Form.
Table of Contents
- What is a WordPress plugin?
- How to get an API key?
- Elastic Email WordPress Sender
- How to use Elastic Email Subscribe Form?
- Key Takeaways
What is a WordPress plugin?
In short, a WordPress plugin email is a software add-on that once installed can greatly enhance the program capabilities.
There are a couple of reasons why applications are supporting plugins. One of them, already mentioned above, is to enhance existing features or extend them thanks to third-party developers. Another option is to create new features without changing the host application. And finally, the plugin can be used to actually reduce the size of an application. Either by filtering out the duplicate files, importing only selective modules instead of a full library, or creating a bundle to compress the size.
A plugin usually cannot stand by itself, therefore it needs a host application to “latch onto”. In exchange, the plugin helps to improve an already existing application in many ways. Need another example? How about Chrome extensions? Chrome by itself is a working browser, but you can greatly enhance it by installing a set of extensions that cater to your needs. It can be a Pinterest plugin that allows you to save any online pictures that you find interesting. Could be Grammarly if you want to quickly proofread your article for any mistakes. It can even be a plugin that changes the look of the browser.
Now, I’m pretty sure that most of you have either heard of or are actively using WordPress. WordPress email plugin also has an impressive library of plugins and among them are two of my absolute favorites - Elastic Email Sender and Elastic Email Subscribe Form. You can easily link them to your WordPress using the API key.
How to get an API key?
It doesn’t matter which plan you have, the access to the API key is always the same. First, you need to log in to your Elastic Email dashboard. Next, you click on your profile in the top right corner and choose “Settings”.
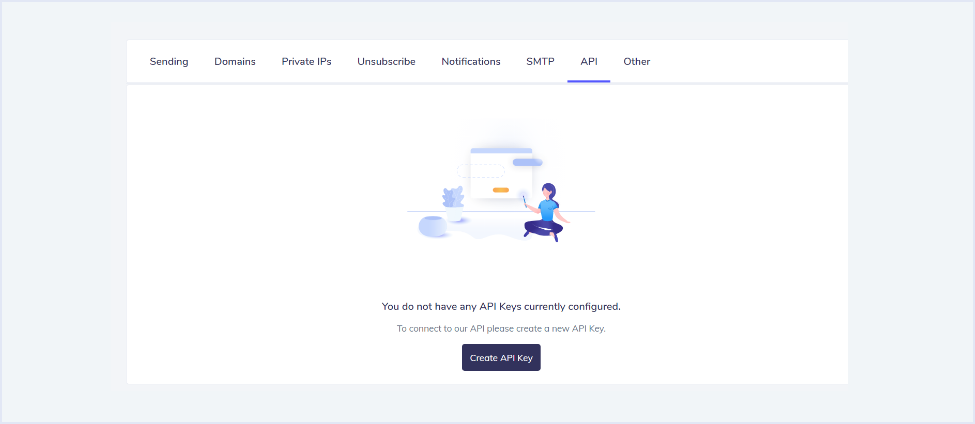
Then you need to select “API” and pick “Create API key”. Finally, you need to name it and use one of our preset options called “plugin”. Once you finish the setup and click on “create”, a pop-up window will appear with your API key. Then all you need to do is copy it!

Elastic Email WordPress Sender
This is a neat plugin that allows you to transfer all Elastic Email’s powerful sending tools directly to WordPress. Let’s imagine you are using WordPress on a daily basis to maintain your site, write posts and update services or products, etc. At the same time, you want to be engaged with your audience or create a link between your company and them. The best possible way to do so is to send emails. However, if you are mainly using WordPress it can be tiring to go back and forth between the applications, logging in every time, and sometimes monitoring two apps at once. It’s very easy to make a mistake.
But this is not all! You probably know that there is a WordPress mail function where you can send emails. But this tool has some restrictions that ultimately makes it pretty much unusable. For example, you have to keep in mind that you can only send a certain number of emails per day. That means that while your subscriber count grows the number of emails you can send is still the same. Eventually, you might end up with more recipients than your email limit.
When it comes to WordPress hosting security, it's crucial to consider the potential drawbacks of free or inexpensive hosting services. These servers often lack the necessary infrastructure for building a reliable sender reputation, leading to potential issues with email delivery rates. Additionally, the limited attachment size of up to 1MB can be highly restrictive, especially if you frequently send larger files such as invoices or ebooks to your recipients.
The good news is that you don’t really need to struggle with all the above problems. Instead, you can use the Elastic Email Sender plugin to monitor analytics, send an email and utilize the unlimited email plans directly from WordPress. The attachment size is 10 times bigger, and you can choose between transactional or email marketing WordPress to send to your subscribers.
One important thing to add is that if you have an issue sending emails, you will know why. In the WordPress mail function, you send an email, but have no possible way to verify if it was received, bounced or blocked. However, when using Elastic Email Sender you will see everything that happened with your emails from the dashboard. Furthermore, the emails are also categorized based on channels so you can know exactly how many emails were sent using the Sender plugin.
The installation is simple. You need to create your account with Elastic Email and log in only once to get your API key and copy it to WordPress. It might sound complicated at first but let’s take you through step by step.
- Log in to your WordPress dashboard and click Plugins in the left sidebar.
- Click Add New at the top of the page and then search for “Elastic Email Sender” and click “Install Now”.
- Click Activate Plugin.
- Enter your Elastic Email API key in the plugin settings with permission “plugin”, and click Save Changes.
While using Elastic Email Sender, you will see an option to “send test”. It’s also a very useful tool to check why emails are not being sent from your account. Simply put the email address into the designated space and send the test email. If there is something wrong, a message will show up in the same window explaining exactly what is the issue.
Enjoying this content?


How to use Elastic Email Subscribe Form?
Nowadays, people struggle with a decreased attention span and trouble remembering every page they have landed upon. That’s why you need to find a way to constantly remind them of your existence and all the amazing offers you create. At the same time, you want to provide valuable content that will also inform them about updates, news, and posts that might interest them.
The best way to build such an audience is by enabling them to subscribe to you. The concept is simple. You create a signup form, let people input their details, and then they are added to your recipient list. But there is a catch. It’s not so easy to create a signup form all by yourself without any prior knowledge of the technical aspects as well as the graphic design.
Luckily, Elastic Email Signup Form is a perfect solution. This plugin offers an aesthetically pleasing, easy to set up signup form widget you can put directly on your page. Not only that, but it’s compatible with pretty much any other plugin. So no matter if you’re using WooCommerce or another addon, the Subscribe Form will work just fine. If you never used a widget before, it’s like a small gadget for your website that visitors can see and interact with. It can include toggle buttons, pull-down menus, progress indicators or like in this example, signup forms. To use it you simply need to install the plugin on your WordPress site and follow the directions below:
- Log in to your WordPress dashboard and click Plugins in the left sidebar.
- Click Add New at the top of the page and then, search for “Elastic Email Subscribe Form” and click “Install Now”.
- Click Activate Plugin.
- Enter your Elastic Email API key in the plugin settings with permission Plugin, and click Save Changes.
- If you do it successfully, you will see “You are connected as” and new options will appear under “Elastic Email” in the left sidebar.
Now, once you install WordPress Email plugin, there are so many options you can change to further personalize it to your needs. Let’s go through them one by one.
First up is how to actually change the look of this widget. What you need to do is access the “Appearance” section and select “widgets”. Depending on your chosen theme, you will have multiple sections where you can drag and drop the widget. Additionally, if you’d like more than one of those widgets - you can do that! Just keep dragging and dropping the feature in places you want it to be and the signup form will be visible on your page.
There are a lot of options to choose from if you want to change how the widget looks. You can switch the color scheme, the text, or the positioning with ease (just look at the picture below for reference).

What is interesting though, is the list option. In Elastic Email Signup Form, you can have multiple lists and decide on which of those lists your contacts should land. Let's go through an example to help you understand it better.
You can create multiple lists in your plugin screen. You can delete them or add them directly from WordPress. Those lists will be updated automatically on your Elastic Email Dashboard. Next, when you go to personalize your subscriber form, you will have an option to select the lists you want to be used. Now you can go about that in two ways.
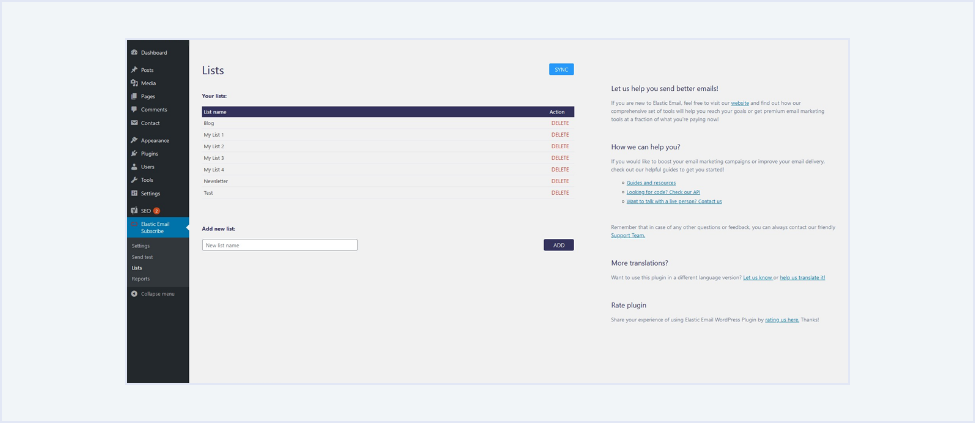
First, you can check the ‘list selection by the subscriber” box in order for the recipient to decide which list they want to subscribe to. In that case, you need to check at least one list from your pool. Now, if you will keep the ‘list selection by the subscriber” box unchecked, you will have full control over where email addresses are added. Each contact that will subscribe will be added to all the lists you’ve marked from the “my lists” section.
Finally, the Elastic Email Signup Form has one more additional feature to assist you with weeding out the spam emails. It’s reCaptcha v2. You can enable it by accessing the “Security” tab and filling out the designated fields. It’s important to point out that the keys are from the Google website and also, Signup Form only supports the invisible reCaptcha v2. Therefore, if you use any other format, it will not work with this plugin.

Using the plugins in WordPress can unravel a wide world of possibilities. It can greatly enhance the user experience and help you out with maintaining your business with ease. However, if you do have any questions or doubts don’t hesitate to reach out to our Customer Success Team that is here for you 24/7.
Key Takeaways
- Elastic Email offers two main WordPress plugins: Sender and Subscribe Form, designed to enhance email capabilities directly within your WordPress site
- A WordPress plugin is a software add-on that significantly enhances or extends a program's capabilities without changing the host application, similar to Chrome extensions
- The Elastic Email WordPress Sender plugin allows you to transfer Elastic Email's powerful sending tools to WordPress, overcoming limitations of the default WordPress mail function
- The Elastic Email Subscribe Form plugin helps you build an audience by providing an aesthetically pleasing and easy-to-set-up signup form widget for your page
- Both plugins require an API key from your Elastic Email dashboard for integration, which can be created by logging into your account, navigating to settings, selecting "API," and choosing the "plugin" preset option

Anna Wybieralska
Anna was working as a Content Creator in Elastic Email. An email marketing enthusiast with a millennial approach. She's either writing, buying plants or avoiding social interactions.